Wet-on-Dry Watercolor Fundamentals: Master Clean, Controlled Techniques
Master wet-on-dry watercolor techniques for clean, controlled results. Learn the fundamental differences from wet-in-wet, layering philosophy, and strategic lifting methods for precise watercolor painting.


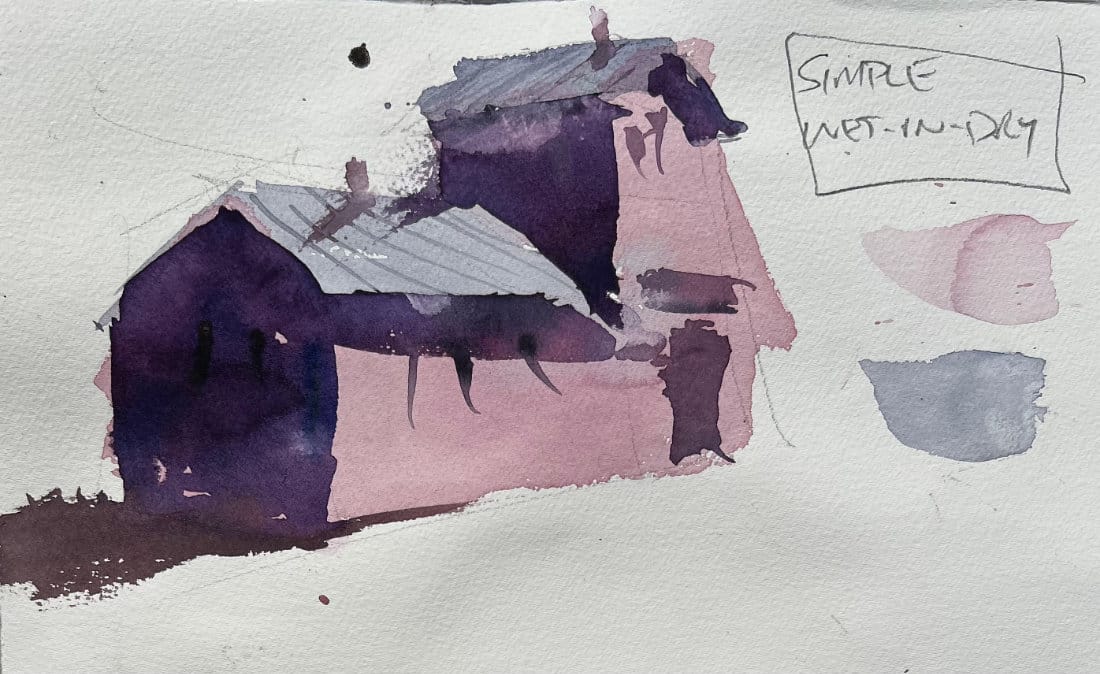
Wet-on-dry watercolor represents the controlled counterpoint to wet-in-wet's organic unpredictability. This fundamental technique involves applying wet paint to completely dry paper, creating clean edges, precise control, and the ability to build systematic layers without unexpected bleeding or color mixing.
👉 Want step-by-step lessons? Visit the Watercolor Hub for tutorials and free courses.
Watch Video: time to level up your watercolor skills, hit play and start learning.
The Fundamental Philosophy: Loose to Tight Progression
Core Principle: "It's hard to start tight and then loosen up later. You kind of have to set the tone early on."
This philosophy shapes the entire wet-on-dry approach:
- Begin with loose, gestural applications
- Build structure through subsequent layers
- Maintain painting vitality while gaining control
- Set the overall energy from the first brushstroke
Key Differences from Wet-in-Wet
Surface Preparation:
- Wet-on-Dry: No pre-wetting—paint applied to completely dry paper
- Wet-in-Wet: Pre-wet surface creates bleeding and fusion
Edge Quality:
- Wet-on-Dry: Clean, controlled edges that stay where placed
- Wet-in-Wet: Soft, organic edges with natural bleeding
Layer Building:
- Wet-on-Dry: Each layer remains distinct and controllable
- Wet-in-Wet: Layers fuse and blend unpredictably
Detail Work:
- Wet-on-Dry: Precise detail placement possible
- Wet-in-Wet: Details limited by surface moisture
The Strategic Layering Approach
Layer 1: Foundation with Tea Mixture
Purpose: Establish basic color and loose energy Application: Light, gestural brushwork with minimal pigmentMindset: Focus on overall shapes and energy, not details
Layer 2: Building Structure
Consistency: Thicker paint (milk mixture) for more opacity Strategy: Can use same color for deeper saturation or introduce new colors Technique: Leave "little pops" of original wash for variety and visual interest
Layer 3: Definition and Details
Application: Controlled placement of shadows, architectural elements, textures Paint Consistency: Thicker applications for precise control Focus: Windows, doors, structural details, cast shadows
Technical Execution Methods
Brush Handling:
- Maintain loose brush grip for gestural foundation layers
- Develop systematic approach to layer building
- Allow each layer to dry completely before proceeding
Paint Consistency Management:
- Tea mixture: Foundation washes and initial color
- Milk mixture: Intermediate layers and color building
- Honey mixture: Details and final accents
Color Strategy:
- Establish palette consistency across layers
- Use color temperature to create depth and interest
- Maintain value relationships throughout layer building
Strategic Lifting Techniques in Wet-on-Dry
Creating Light Effects: Lifting paint while still damp creates illusion of light hitting surfaces—particularly effective on architectural features and focal points.
Breaking Up Tight Lines: Strategic lifting prevents overly mechanical appearance by introducing organic variety within controlled technique.
Surface Variety: Selective paint removal creates textural interest and prevents flat, lifeless areas.
The Clean, Controlled Aesthetic
Visual Characteristics:
- Crisp edges and clear separations between elements
- Predictable color relationships
- Systematic value structure
- Architectural precision where desired
When to Choose Wet-on-Dry:
- Architectural subjects requiring precision
- Detailed botanical illustrations
- Portrait work needing controlled edge quality
- Situations requiring predictable results
Comparison with Wet-in-Wet Results
Wet-on-Dry Advantages:
- Complete control over paint placement
- Ability to create precise details
- Predictable layer interaction
- Clean, crisp aesthetic
Trade-offs:
- Less organic, spontaneous character
- Requires more deliberate planning
- Can appear tight if not handled with loose initial approach
- Less atmospheric effects than wet-in-wet
Building Your Wet-on-Dry Skills
Practice Progression:
- Simple geometric forms with basic layering
- Architectural subjects for structure practice
- Complex compositions integrating multiple techniques
- Mixed approach combining wet-on-dry control with selective wet-in-wet effects
Key Development Areas:
- Loose initial application while maintaining control
- Strategic layer planning before beginning
- Edge quality management throughout the process
- Lifting timing for maximum effectiveness
Integration with Complete Watercolor Technique Arsenal
Wet-on-dry mastery, combined with wet-in-wet skills, provides complete technical foundation for any watercolor approach. Advanced practitioners often combine techniques within single paintings:
- Wet-in-wet for atmospheric backgrounds
- Wet-on-dry for structural elements
- Strategic mixing for optimal artistic expression
Next Steps in Your Wet-on-Dry Journey
This foundational technique opens pathways to:
- Advanced layering methods with complex color relationships
- Architectural painting mastery using systematic building approaches
- Mixed technique integration combining controlled and organic effects
- Personal style development using wet-on-dry as expressive foundation
Key Takeaways
- No pre-wetting creates fundamental difference from wet-in-wet
- Loose-to-tight progression maintains painting vitality
- Systematic layering builds structure and depth
- Strategic lifting adds light and variety
- Complete drying between layers ensures clean results
- Controlled technique serves precise artistic vision
Wet-on-dry provides the technical precision that, when combined with wet-in-wet's organic effects, creates comprehensive watercolor mastery. The key lies in understanding when each technique best serves your artistic goals.
Series Navigation Links
- Previous: wet-in-wet mastery series
- Next: Variegated wet-on-dry advanced techniques
- Related: watercolor mix and watercolor techniques
Questions about wet-on-dry technique fundamentals? Share your specific challenges in the comments—mastering controlled watercolor techniques often requires troubleshooting specific situations.
Continue Learning
👉 Next stop: check out my Free Watercolor Painting Course or browse the Watercolor Tutorials Hub to keep building your skills.
👉 Follow me on Pinterest for daily watercolor inspiration!
👉 Check out the Painterly Hub - learn more about loose, expressive painting techniques.
If you enjoy these kinds of raw insights and loose watercolor demos, you’ll feel right at home here. Subscribe to Crafted by Robert and follow along as I share painting inspiration, tips, and behind-the-scenes stories straight from my garage studio. 👉 Subscribe to Crafted by Robert
My Complete Toolbox
Here are the materials I use all the time and have for decades. I only buy from Blick Art but feel free to shop where you prefer.
Recommended Watercolor Materials
-
Holbein Professional Watercolor Paints – 8 Essential Hues
Yellow Ochre, Cadmium Lemon Yellow, Ultramarine Blue, Cerulean Blue, Alizarin Crimson, Cadmium Red Light, Neutral Tint, Burnt Sienna -
Fabriano Artistico Watercolor Paper – 140lb Cold Press
Buy full sheets and cut into quarter sheets for best value -
Silver Jumbo Wash Brush
Great coverage, excellent quality for the price -
Princeton Neptune Point Rounds (No. 12 & 6)
Reliable and affordable detail & wash brushes -
Princeton Neptune Dagger (1/2")
Versatile size for lines, edges, and detail work -
Masterson Aqua Pro Palette
Durable, with deep wells for generous mixing space -
Gator Board
Lightweight, long-lasting painting support board -
Holbein White Gouache
Optional for highlights and fine details - Miscellaneous: plastic water containers, paper towels, masking tape


