Student Car Drawing Critique: What Went Wrong
Real student work from the 1-minute car challenge - with honest critiques. See the most common mistakes, why they happen, and exactly how to fix them.


Alright, time for the real learning to begin.
You've seen the foundation method, taken the challenge, watched me struggle through my own attempt. Now let's look at what actually happened when students faced that timer.
And honestly? This is where the magic happens. Because seeing common mistakes - and understanding exactly why they happen - teaches you more about drawing than a dozen perfect demonstrations.
More drawing lessons? Visit the Free Drawing Tutorials & Courses hub →
I'm going to walk you through some actual student results from the 1-minute car challenge. No names, no judgment, just honest feedback about what worked, what didn't, and most importantly, how to fix it.
Ready for some real talk about drawing cars?
The Most Common Problem: Getting the Proportions Wrong
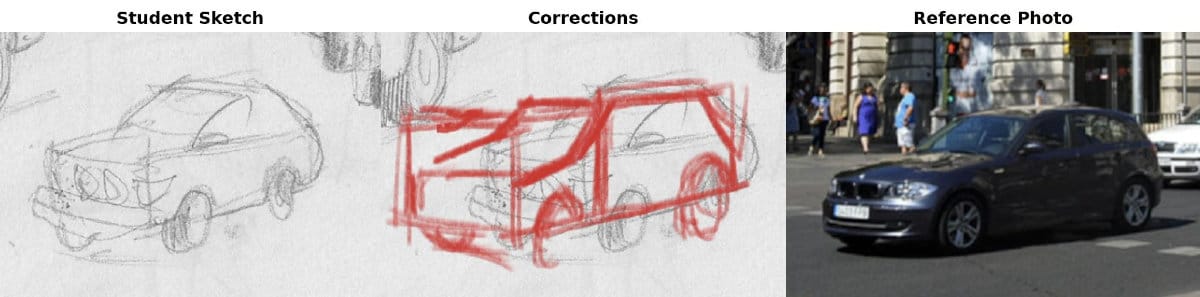
Let me start with something I see over and over again. Student had decent angles - the perspective wasn't bad at all. But look what happened with the wheel placement.
See how the front wheel ended up too far back toward the rear? This is a classic proportion mistake, and here's why it matters:
The tracking principle: If you drop a line straight down from the back edge of the side window, that wheel should be well in front of that line. But in this drawing, the line goes right through the middle of the wheel.
What went wrong: The basic box structure was too short. The student could see the tire sticking out and tried to make it work, but once your foundation box is wrong, everything else gets forced into the wrong place.
How to fix it: Spend more time measuring that initial box. From the front corner to the back corner, this car is actually quite a bit longer than it first appears. Trust your measurements over what looks "right."
The front of the car should have extended further forward, which would have put the wheel in the correct position. Then everything else would have tracked properly.
When Everything Tracks Except the Foundation
Here's what's interesting about this mistake - everything else was working. The bumper, windows, and details were all tracking nicely on the front plane of the car. The student understood perspective; they just got the initial proportions wrong.
This is exactly why we start with the box method. All those details are meaningless if the foundation structure is off.
Think about it this way: you can draw the most beautiful headlights in the world, but if the car's basic proportions are wrong, those headlights are just going to emphasize the mistake.
The fix: Go back to basics. Measure the relationship between the front section and the rear section. In this case, the distance from that front corner all the way to the back was significantly longer than the student initially established.
When the foundation box is right, everything else falls into place naturally.
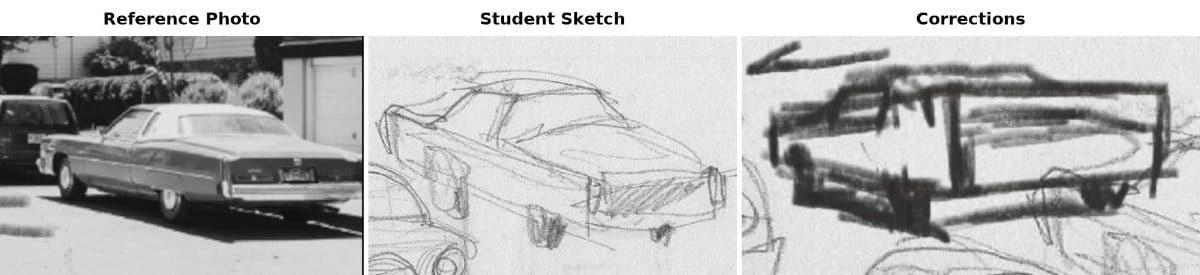
The Cadillac That Broke Everyone
Now let's talk about the car that gave me trouble too - that long Cadillac. This one was genuinely challenging, and here's why most students struggled with it.
The angle problem: Students were making the perspective angle way too steep. Look at the reference image - that bottom edge is almost parallel to the bottom of the page. We're talking about a very slight angle, not the dramatic perspective most people drew.
Why this happens: When something looks like it should have dramatic perspective, our brain wants to exaggerate it. But you have to trust what you actually see, not what you think should be there.
The tracking disaster: Because the angle was wrong, students couldn't figure out where to put the back tire. They'd start to draw it, realize it looked weird, and then not know how to fix it.
The solution: Start with that very slight bottom angle. Then everything else - the bumper, windows, all the horizontal elements - will track correctly. The box should feel very long and relatively thin.
When you get that foundation right, you'll have room for the back tire, and it'll sit naturally on the ground plane.
Understanding Tracking Lines
This is probably the most important concept for students to grasp: everything in perspective follows the same tracking lines.
If the bottom of the front tire sits at a certain level, and you extend that line back following the car's perspective, that's exactly where the bottom of the rear tire should hit.
Common mistake: Students draw the rear tire too low because they think "things get smaller in the distance." But smaller doesn't mean they sink into the ground. The bottom edge still follows the same perspective line.
How to check yourself: Draw that tracking line from the bottom of the front tire extending back. If your rear tire dips below that line, you've made the mistake.
This applies to everything - door handles, window edges, bumper lines. They all follow the perspective system.
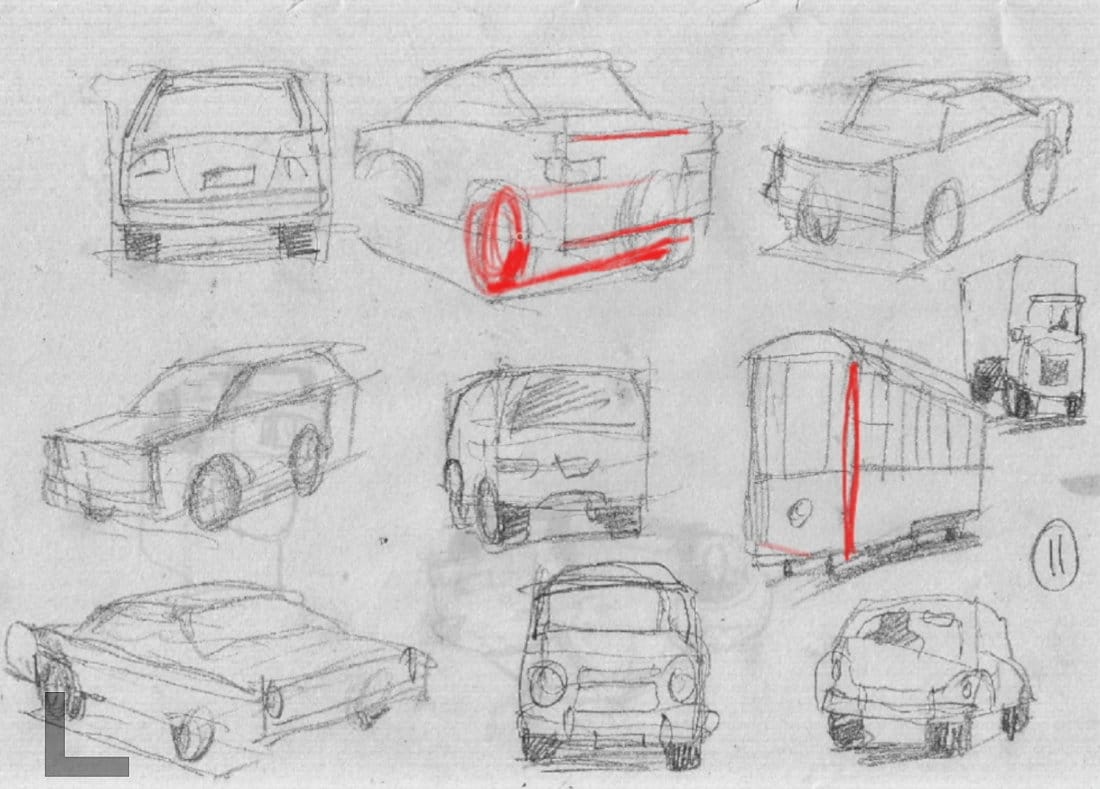
The Good Examples (Yes, There Were Some!)
Not everything was struggle and frustration. Let me show you what worked.
One student really nailed the perspective on a complex vehicle. The angles were spot-on, and you could feel that three-dimensional form sitting convincingly in space.
My only feedback: The top angle was just slightly too flat. Remember, when you have a corner closer to you, you get one angle moving one way and another angle moving the opposite direction. No getting away from that fundamental rule.
What they did right: They saw the structure first, captured the perspective confidently, and used a loose, gestural style that would work beautifully in a watercolor painting.
The lesson: Sometimes being slightly off is totally fine, especially when the overall understanding is solid. We're not drafting blueprints here.
Why This Matters More Than Perfect Drawings
Here's what I want you to understand: every single one of these "mistakes" represents learning. The student who got the wheel placement wrong? They learned more about tracking and proportions from that one drawing than they would from ten "successful" sketches.
The real goal isn't perfect cars. It's building visual intelligence. It's training your eye to see structure, understand perspective, and make quick decisions under pressure.
When you're creating actual art - a watercolor cityscape, a sketched street scene, whatever - these cars will probably be small parts of larger compositions. But you want them to be believable, to sit convincingly in space, to feel solid rather than flat.
Moving Forward Without These Foundations Is a Mistake
Here's my honest advice: if you made similar mistakes on this challenge, go back and do it again. Don't move forward to more complex subjects until this stuff clicks.
Why? Because these same principles apply to everything. Buildings, furniture, people, animals - they all follow the same perspective rules, the same tracking principles, the same proportional relationships.
You can't skip the fundamentals and expect different results later.
It's tempting to think "I'll just avoid drawing cars" or "I'll stick to subjects that seem easier." But running from these challenges means you'll hit the same walls over and over again.
The Cerebral Phase
Right now, this probably feels very mental, very calculated. You're thinking hard about every angle, every measurement, every relationship. That's normal and necessary.
But here's what happens over time: This becomes intuitive. You'll look at a car - or any complex subject - and automatically see the perspective lines, the proportional relationships, the tracking systems.
The thinking becomes automatic, which frees up your conscious mind to focus on expression, style, and artistic decisions rather than basic structural problems.
Every professional artist went through this exact learning curve. The difference is they stuck with the fundamentals long enough for them to become second nature.
What's Next in Our Series
We've completed a full learning cycle with cars: foundation method, challenge assignment, teacher demonstration, and student critique. This is how real art education should work.
Coming up: We're going to apply this same systematic approach to buildings. Same principles, different subject matter. You'll see how the box method adapts to architectural subjects, and we'll run through the complete challenge series again.
But before we move on: Make sure you've really absorbed these lessons about tracking, proportions, and perspective angles. They're going to be even more important when we start dealing with complex building shapes and multiple perspective points.
The Bottom Line
Drawing isn't about talent or some mysterious artistic gift. It's about seeing clearly, understanding basic principles, and applying them systematically.
These student critiques show exactly what happens when those principles get ignored or misunderstood. But they also show how specific, targeted feedback can fix problems that seem overwhelming.
Every mistake is fixable. Every struggle is temporary. Every challenge makes you stronger.
The students who take this feedback seriously and apply it to their next attempt? They're the ones who break through to the next level.
Don't be the artist who keeps making the same mistakes because you never stopped to understand what was actually going wrong.
Complete Car Drawing Series:
- How to Draw Cars: The Foundation Every Artist Needs - Learn the systematic box method
- The 1-Minute Car Drawing Challenge - Put your skills to the test
- My Take: Teacher Attempts 1-Minute Car Challenge - See real results under pressure
- Student Results & Common Mistakes ← You are here
- Tracking Lines - Students struggled here, so watch the vid and fix common issues
- Building Drawing Foundation Series - Coming next
How did these critiques compare to your own struggles with the car challenge? Which mistake felt most familiar? Drop a comment and let me know what clicked for you - or what you're still working to understand!