Skull Front View Proportions: Understanding the 2:3 Ratio
Understanding front skull proportions is essential for portrait drawing. This theory lesson covers the 2:3 ratio that makes front view different from profile, the egg shape structure, and two methods (thirds and halves) for locating facial features accurately.


The front view of the skull has completely different proportions than the profile view. Understanding this 2:3 ratio and learning two reliable methods for placing features will set you up for accurate portrait drawing. This is theory - the drawing demo comes next.
What You'll Learn
- Why front view is 2:3 ratio (not square like profile)
- The egg shape structure and common mistakes
- Thirds method for feature placement
- Halves method for feature placement
- Where eyes, nose, lips, ears, and eyebrows go
Video Lesson
The 2:3 Ratio (Not Square!)
From the front view, the skull has a 2:3 ratio - 2 parts wide, 3 parts tall. This is very different from the profile view which was more square or boxy. When you draw a rectangle around the front skull, you'll see it's clearly rectangular and longer than it is wide.
This is created by drawing a full circle from the top of the skull down to just below the nose, then adding a half circle from below the nose to the chin. That gives you 3 halves total vertically, while horizontally there are only 2 parts.
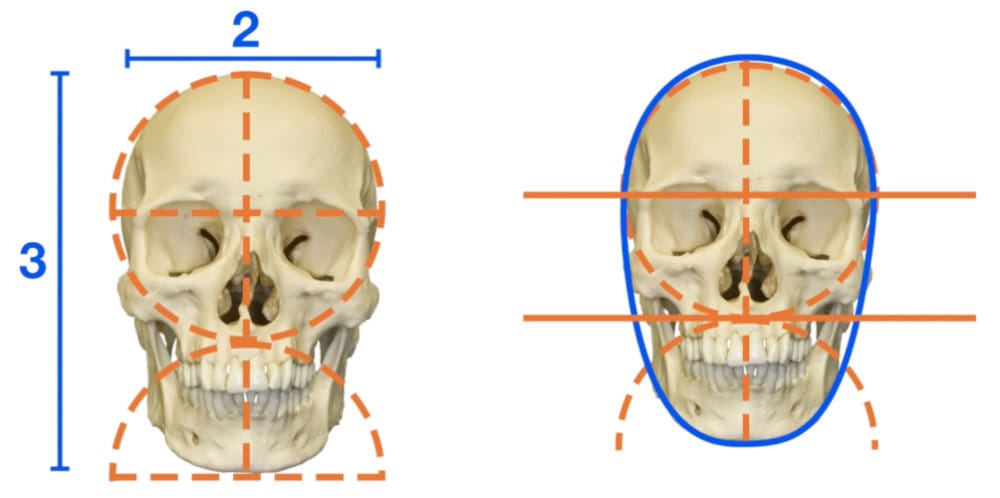
The Egg Shape (Not an Oval!)
The overall shape is an egg - wider at the top, narrowing toward the chin. This is NOT a perfect oval where top and bottom match. That's a common mistake that makes heads look wrong.
The egg shape varies by person - some are more narrow at the chin, some more rounded - but the key is that the top (skull) is always wider than the bottom (chin area).
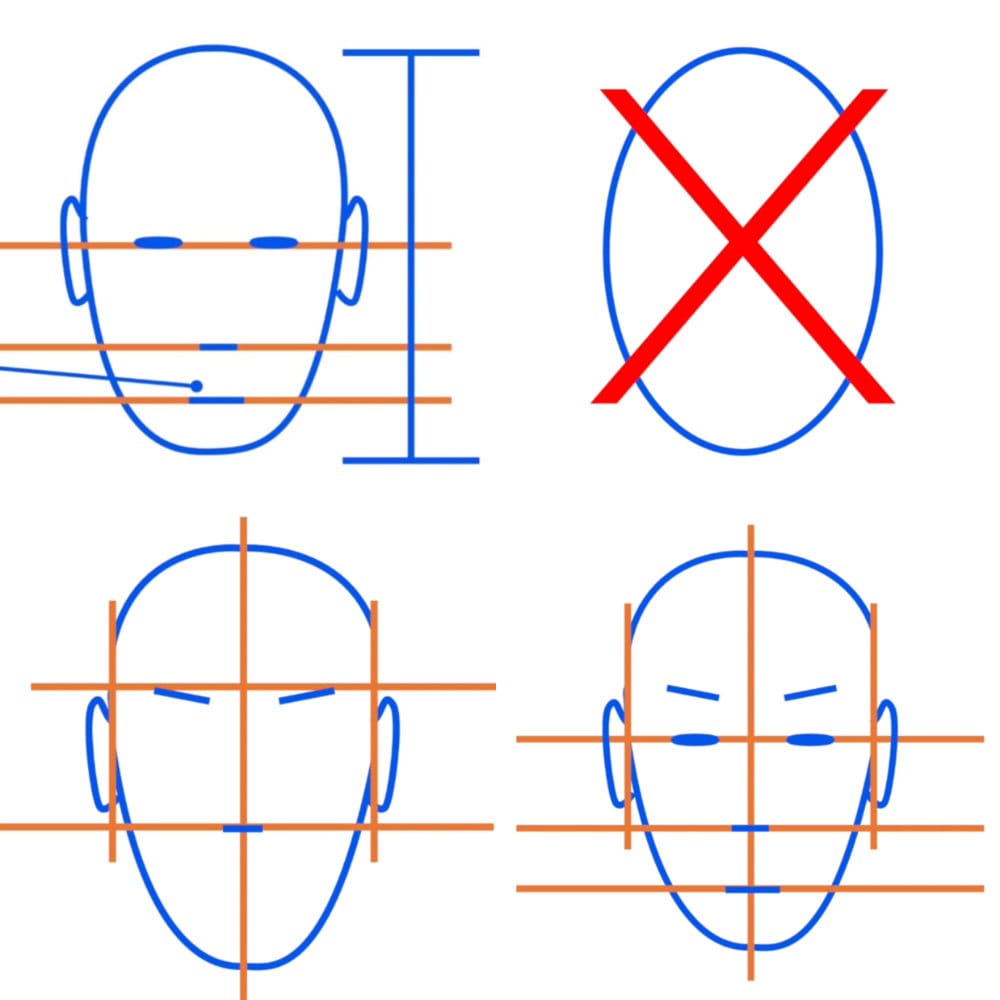
Method 1: Using Thirds
Divide the egg shape into three equal horizontal sections:
Top third line: Arch of the eyebrows (just above)
Middle of middle third: Where eyelids meet (center of eyes)
Bottom third line: Root of nose (where it meets upper lip)
Middle of bottom third: Bottom edge of lower lip
Ears: Located somewhere in the middle third
This thirds method gives you quick reference points for most major features.
Method 2: Using Halves
- Divide the egg shape in half horizontally - this locates where the eyelids meet.
- Take the bottom half and divide in half - this gives you the root of the nose.
- Take that bottom section and divide in half - this gives you the bottom of the lower lip.
- Both methods work. Over time you'll develop a preference, but for now practice both.
The Center Line
Draw a vertical line down the middle to help with symmetry. This guides placement of nose, lips, and the spacing between eyes.
A Subtle Detail
The skull shape tends to flatten or lose roundness just above the ears, coming down to where the jaw begins. This varies by person but is a subtle characteristic worth noting.
Study Assignment
Before the next lesson (where we'll draw this), study front-view faces:
- Identify the egg shape (wider top, narrow chin)
- Notice the 2:3 ratio
- Find the thirds or halves divisions
- Observe where features actually sit
Don't draw yet - just analyze and understand the proportions.
Next Lesson: We'll put this theory into practice with a complete drawing demonstration.
Continue Learning
- Previous: Skull Profile Drawing Demo
- Next: Skull Front View Drawing Demo
- Visit the Head Drawing Hub for a complete list of available lessons
Continue Learning
If you enjoyed this hand drawing course, explore even more lessons on our Free Drawing Tutorials & Courses Hub — including the complete How to Draw – Beginner’s Course.
Want new tutorials delivered to your inbox? Subscribe here and get free lessons, tips, and inspiration sent directly to you.