How to Learn Head Drawing from Master Artists (Raphael Edition)
Study how Raphael structured head drawings to master angles and proportions. Learn to spot skull direction, proper ear placement, and the face-wrapping technique that makes drawings feel dimensional.


You know what's cool about studying old master head drawings? They figured out all this stuff centuries ago. We're just reverse-engineering their methods.
Let's dig into some Raphael sketches and see what he was thinking.
Want drawing lessons? Visit the Free Drawing Tutorials & Courses hub →
Watch video: hit play and see how Raphael used similar head drawing techniques we have covered so far...
Direction is Everything
Look at any Raphael head study and you'll see two key angles:
- Top of the skull moving one direction
- Face mask moving another direction
These opposing angles create the gesture of the head. Miss them, and the whole thing feels flat.
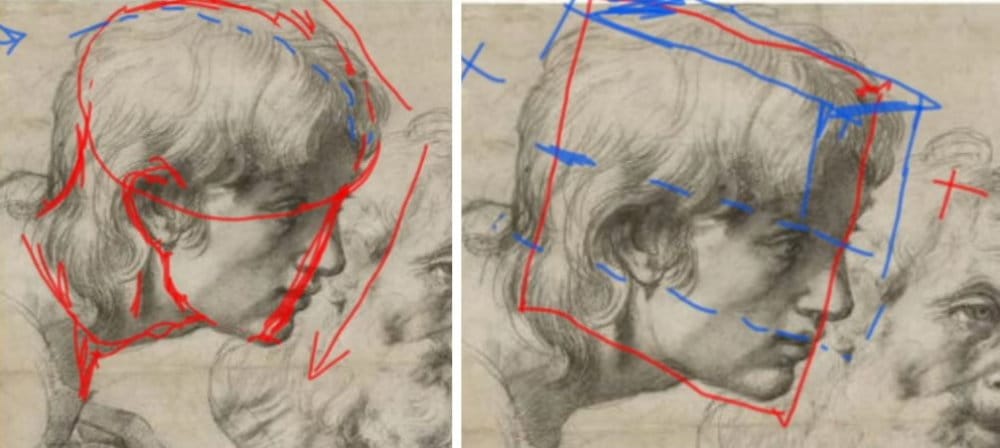
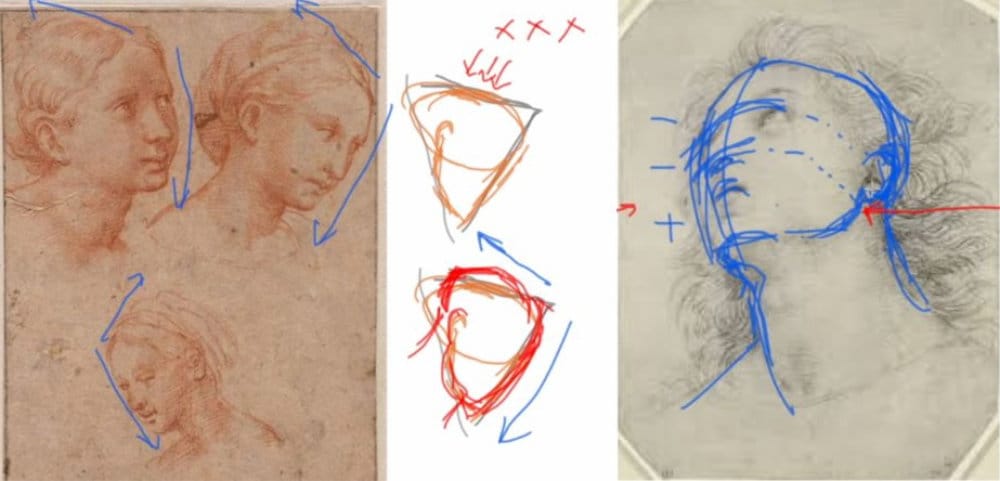
The Three Heads Example
Check out this Raphael sketch with three heads at different angles.
Top left head: Skull moves up and back. Face mask moves down. The figure is looking up slightly.
Top right head: Same idea, but stronger angles. Figure looking down more, so the top of the skull angles up more sharply.
Bottom head: Figure looking down and to the left. Those opposing directions are clear.
See the pattern? It's always skull one way, face the other way.
The 5-Degree Mistake
Here's the thing that'll mess you up: getting the skull angle wrong by just 5 degrees.
Seriously. Five degrees.
Look at the top right head. If you angle that skull incorrectly - even slightly - you end up pushing down on the top of the head. Then when you add hair and features, the spacing is wrong. The whole drawing feels cramped.
The fix? Check your directional arrows early. Get that skull gesture right before you go further.
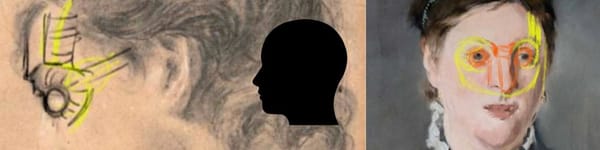
When the Head Tilts Up
Different angle, different ear placement.
When someone's looking up:
- Less space at the top
- Less space for the nose
- More space at the bottom
- Ear pushes up toward the top of the head
The spacing changes. It's not thirds anymore - it's adjusted thirds based on the angle.
Face In Front of Ear (Always)
This trips people up constantly.
The face wraps around and stops in front of the ear. The ear is on the side of the head.
Look at how Raphael draws the chin and jaw. They curve around, then stop before the ear. The ear doesn't connect to the front of the face - it's set back on the side.
Easy to get wrong. Easy to fix once you see it.
The Hair Part Problem
Look at the boy's head in Raphael's sketch - the one looking down with that part in his hair.
Here's the trap: that hair part isn't the center of the skull. It's easy to follow the part and accidentally crop off the top of the head.
The actual skull sits slightly above that part line. It's not as high as the hairline on the opposite side (which is visible), but it's higher than the part.
The lesson: See through the hairstyle. Don't let it fool you into cutting off skull volume.
The Slightly-Turned Profile
When you're drawing a profile that has a tiny bit of turn toward the viewer:
The square/box method still works, but now you're seeing:
- A little bit of the front of that cube
- A little bit of the top of the head
- The ear pushed slightly lower because of perspective
The spacing changes too - more room at the top, less at the bottom because you're looking down on it slightly.
It's subtle, but Raphael nailed it.
What Raphael Probably Wasn't Thinking About
Details. Features. Perfect rendering.
He was thinking: "What's this head doing? What direction? Where's the ear go?"
Structure first. Details never.
That's the approach that makes these drawings work.
Your Practice Assignment
Find 3-5 master drawings (Raphael, Michelangelo, da Vinci, whoever).
For each one:
- Draw directional arrows for the skull top
- Draw directional arrows for the face mask
- Note where the ear sits
- Check if the face wraps in front of the ear correctly
- Look for any hair tricks that might fool you
Do this as an overlay or on tracing paper. You're analyzing, not copying.
The goal? Start seeing what the masters saw. Train your eye to catch these structural relationships automatically.
Why This Matters
You can watch 100 tutorials on "how to draw the head." But until you study how the actual masters structured their drawings, something's missing.
They didn't have YouTube. They had apprenticeships, direct observation, and brutal amounts of practice.
We can shortcut that by studying their finished studies. All the thinking is already there on the page - we just need to decode it.
Now grab some master drawings and start analyzing. Structure over details, always.
Continue Learning
- Previous: How to Draw Head in Various Angles
- Next: Head Drawing Assignment Reel
- Course Hub: Complete Head Drawing Course
More Drawing Goodies
If you enjoyed this hand drawing course, explore even more lessons on our Free Drawing Tutorials & Courses Hub — including the complete How to Draw – Beginner’s Course.
Want new tutorials delivered to your inbox? Subscribe here and get free lessons, tips, and inspiration sent directly to you.