My Practice Reel: Watch Me Work Through 10 Head Studies
See how I approach 10 quick head studies in real-time. Learn which structural methods work for different angles, how to make fast decisions, and why staying loose beats trying to finish.


Let me show you how I approach these quick head studies. This isn't about perfection - it's about decision-making and applying the principles fast.
This demonstration is part of the How to Draw Head Series. Be sure to watch from lesson one if you haven't already done so.
Drawing #1: Front View with Square Jaw
Starting with the basic circle plus half-circle underneath. This particular face has a square jaw, so I'm thinking about that shape as I draw.
Center line first, divided in half. The figure's looking up slightly, so I pushed that center line up a bit. Creates that tilt.
The hairstyle covers the ears, so I'm just indicating where the bottom of the ears would be, then chunking in the hair.
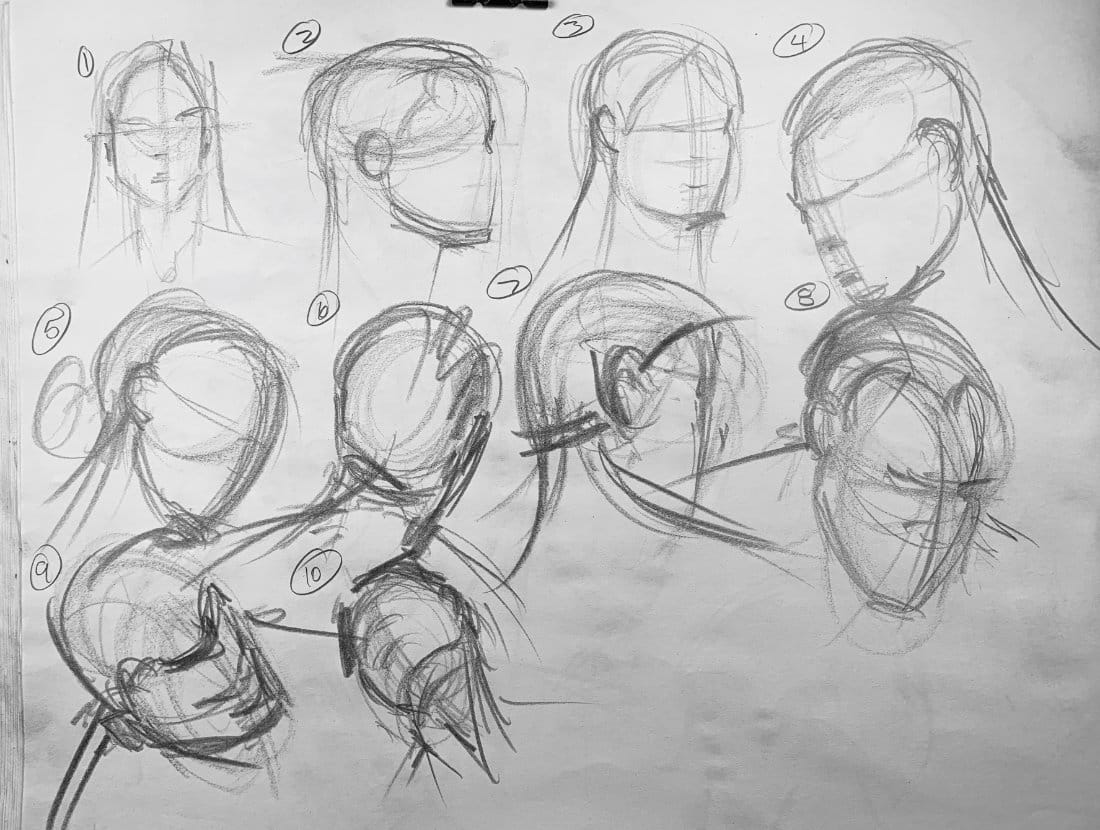
Drawing #2: Classic Profile
Egg shape. Gesture of the head moving back, mask moving down. Combining that upside-down sail idea with the oval.
Placing the ear in that center square - the tic-tac-toe layout. Using it as my guide for eyes and features.
Getting the hairline because that's important. There's a bit of the digastric plane showing under the chin, so I captured that. Then the neck so the head isn't floating.
Drawing #3: Three-Quarter View
Basic oval, center line. That gives me enough to work with.
Each pose is different in how I start it. I'm taking the easiest route from A to B. For this one, the oval with the center line was the fastest way in.
Working quickly, but not rushing. If you get too fast, you stop thinking. Work quick, but stay in control.
Better to leave these raw and unfinished than to try completing them. These practice reels are about capturing gesture and feeling, not details.
Drawing #4: Profile with Turn
Head profile, but we see a bit of three-quarter turn too. Figure looking down, so that pushes the ear toward the back.
Center line running up, facial features indicated just enough to show they're on the front of the shape, not the side where the ear is.
Drawing #5: Looking Up (Challenging View)
We're below the figure looking up. Getting lots of that digastric plane.
Pushes the ear up. Eyes, nose - everything crunches together. Perspective pushes those features really close.
The hairstyle helps a lot here. Hair tells the viewer how the head is turning.
I'm only including features that are needed to make this one-minute gesture work.
Drawing #6: Back View
Basic circle. Figure looking slightly left, but we're not flat-on. The photographer was adjusted right, so we're catching a little of the right side of that face.
Indicated the ears, got the thickness. Using the trapezius muscles to show how they attach to the neck. Getting that overlapping - face in front, then ear, then neck.
Drawing #7: Profile Looking Down
Figure looking to our right and down. Chin pulling toward the body.
Getting that gesture of the top of the head moving up and back. Slight tilt in the axis.
The figure is turning and we're getting the back of the head, so that pushes the ear more toward the front. Not getting full facial features - it's that cheekbone dominating. I left facial features out because I wanted to capture the face turning.
Drawing #8: Top View
Looking over the figure. The dominant shape is the top of that skull. That's the big shape - need plenty of it.
Figure looking down pushes the ear up and features down. Getting the dominant feel of the skull top versus the mask of the face.
Hairline is a good indicator here. I didn't give the back of the skull enough volume at first - made adjustments on the fly.
Drawing #9: Dramatic Top View (Capsule Shape)
Strong capsule feeling. Using straight lines along the sides - almost like a tube.
Circle on top to indicate the skull because this is such an obvious top view. The skull dominates.
Mask of the face and all those features are foreshortened. Creates that illusion of layers and overlapping.
Hairline is critical to tell the viewer what's happening.
Drawing #10: Looking Up and Away
Figure looking up and out to our left. Creating that oval and center line because that helps me get the idea down quickly.
That's what this exercise is about - getting ideas down quick using the techniques we talked about. Trying to figure out which shape to use: capsule, tube, upside-down sail, ovals with the mask gesture.
Different poses present different problems. Finding the right approach at the right time is the challenge. That's what this exercise helps you do.
What This Exercise Teaches
It's not about making 10 great drawings. It's about:
- Quick decision-making on structure
- Choosing the right method for each angle
- Capturing gesture over details
- Working efficiently without rushing
- Staying raw rather than over-finishing
Look at all 10 together. See the variety? That's the point. You're building a visual library of how to approach different angles.
Now it's your turn.
Continue Learning
- Previous: Head Drawing Practice Reel
- Next: Head Box Construction Part 1
- Course Hub: Complete Head Drawing Course
More Drawing Resources
If you enjoyed this hand drawing course, explore even more lessons on our Free Drawing Tutorials & Courses Hub — including the complete How to Draw – Beginner’s Course.
Want new tutorials delivered to your inbox? Subscribe here and get free lessons, tips, and inspiration sent directly to you.