Longest Sustained Curve: Finding the Primary Gesture Line
Always look for the longest sustained curve. That's your primary gesture line. Here's how to find it on every body part - and why the outside usually wins over the bumpy inside.

When preparing to draw figures always look for the longest sustained curve before lead hits the paper. That's your primary gesture line.
Here's how to find it on every body part.
This lesson is part of the Figure Drawing Course - a complete free course teaching you to draw the human body from scratch.
Watch the full lesson
Arms: Outside Wins
Upper arm: The tricep (back of arm) gives you the longest curve from shoulder to elbow.
Forearm: Wrist to elbow on the outside is your longest sustained curve.
The inside of the arm? Bumpier. Shorter. Not your primary line.

Legs: Outside is Smoother
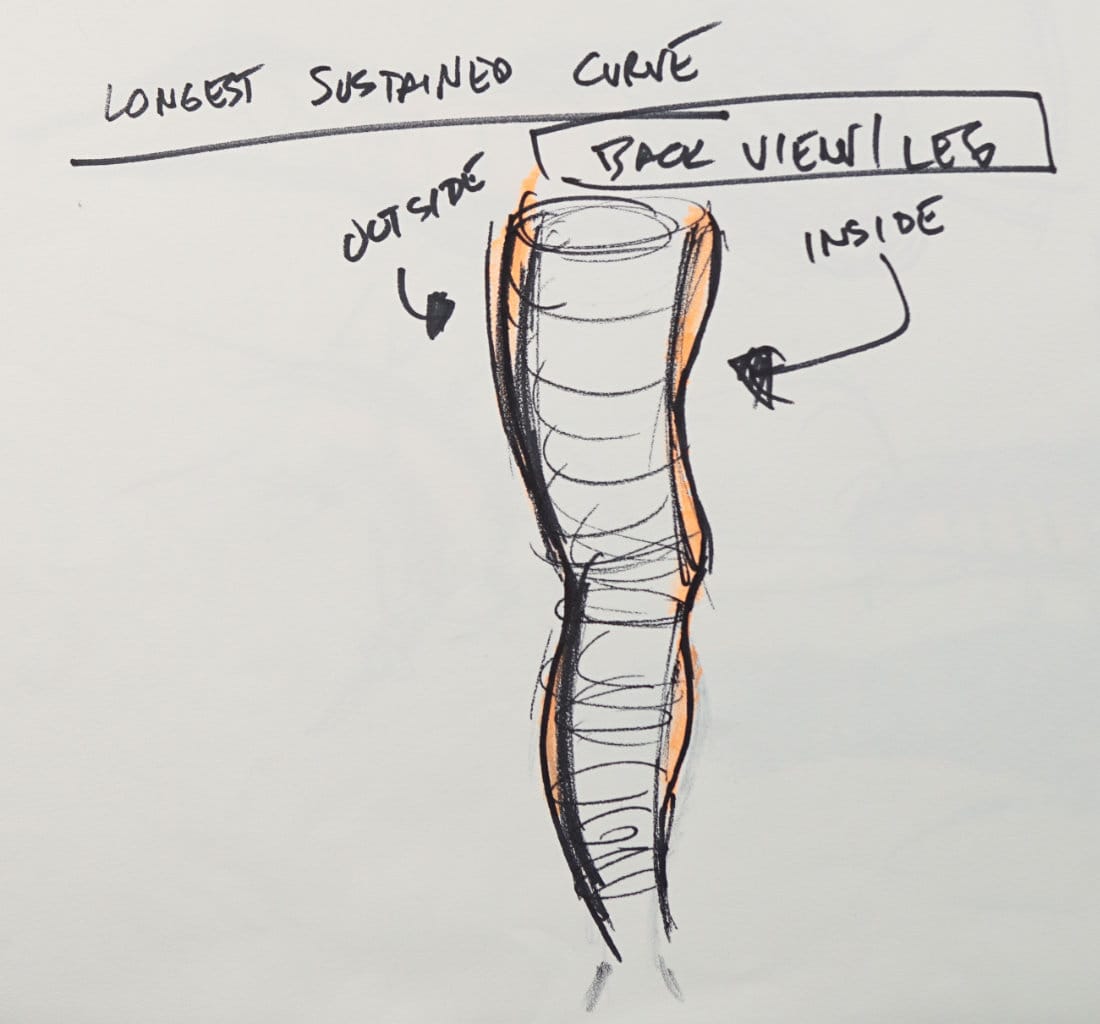
Look at a leg from the back view.
Upper leg (thigh):
- Outside = smooth, longest curve
- Inside = bumpy (muscles bulge out, come in, bulge at knee)
Lower leg (calf):
- Outside = gradual taper to ankle, smooth flow
- Inside = shorter muscle, more variation, bumps
Use the outside for your tube. That's your longest sustained curve.
The Inside is Bumpy - Find the Happy Medium
The inside of the leg has rhythm: bulge out, come back in, bulge at knee connection.
Don't try to follow every bump. Find the happy medium. Average it out. Place your tube line somewhere in the middle of all those variations.
You'll refine it later. Right now, you're establishing the tube.
Why This Matters
The longest sustained curve gives you:
- Primary gesture (the main flow)
- Smoother construction (fewer bumps to manage)
- Easier tube placement (clearer direction)
The bumpy side? Secondary. You'll add those details after the tube is established.
The Process
1. Identify outside vs inside (which side is smoother?)
2. Use the smooth side for your longest sustained curve
3. Average the bumpy side (find the happy medium)
4. Draw your tube with both sides established
5. Refine later (add the muscle variations, bumps, details)
Upper Leg Example
Back view, thigh to knee:
Outside: Smooth curve down, maybe slight straightening at knee. That's your primary line.
Inside: Muscle bulges out, comes back in, might bulge again at knee connection. Average those bumps - place your line somewhere in the middle.
Result: Clean tube capturing the gesture.
Lower Leg Example
Back view, knee to ankle:
Outside: Comes out smoothly from knee, gradual taper toward ankle. Primary line.
Inside: Shorter calf muscle, comes in more, might flare slightly at ankle bone. Happy medium.
Result: Tube with characteristic taper, ready for refinement.
You're Ready
You now have the foundation:
- Structure and gesture
- 3D forms and perspective
- Tubes, characteristic shapes
- Pencil test
- Pinch and stretch
- Connecting line
- Longest sustained curve
This is approachable. Simple. You can do this.
Now let's see these concepts in action.
Course Navigation
Part of: Figure Drawing Course > Module 1: Foundation
← Previous Lesson: Connecting Line
Next Lesson → Master's Analysis: Gesture & Structure
Continue Learning
If you enjoyed this hand drawing course, explore even more lessons on our Free Drawing Tutorials & Courses Hub — including the complete How to Draw – Beginner’s Course.
Want new tutorials delivered to your inbox? Subscribe here and get free lessons, tips, and inspiration sent directly to you.


