How to Shade With Watercolors
Before teaching watercolor shading, I shucked scallops on a 100ft boat 12 hours a day. Those chaotic nights taught me everything about steady hands and working with unpredictable conditions - skills that translate perfectly to mastering wet-on-wet and wet-on-dry watercolor techniques.


Before we dive into watercolor shading techniques, here's something that might surprise you - did you know I used to commercial fish back in the day? Picture this: me on a 100ft scallop boat with a bunch of roughnecks, being the only guy with a full set of teeth, shucking scallops at 2am in the middle of nowhere. Man, how things have changed... from handling rough seas to handling smooth watercolor washes!
But here's the thing - those nights on that rocking boat actually taught me everything I know about steady hands and working with unpredictable conditions. When you're trying to maintain control while everything around you is moving, you learn to work WITH the chaos instead of fighting it.
What You'll Learn in This Tutorial
In this step-by-step guide, we'll explore the fundamentals of watercolor shading using two essential techniques that every beginner needs to master:
- Five-value scale creation for consistent shading
- Wet-on-wet technique for smooth transitions
- Wet-on-dry layering for controlled details
- Light and shadow relationships
- Timing and water control
Understanding Value and Form
Getting back to the basics, we're going to focus on capturing light and shadow through value relationships. You know, working on that scallop boat taught me something crucial about observation - when you're working 15-hour shifts in constantly changing conditions, you learn to really SEE what's happening around you.
Creating Your Five-Value Scale
Start by mixing your grays. I'm using neutral tint for simplicity, but you can pre-mix your grays using ultramarine blue, a yellow, and red. Depending on whether you want it warm or cool, add more blue or red to shift the temperature.
Create a simple scale starting with dark and adding water to each swatch. This gives you a value scale that starts dark on the left and gets lighter as it moves to the right - think of it like the gradual change from stormy seas to calm waters.
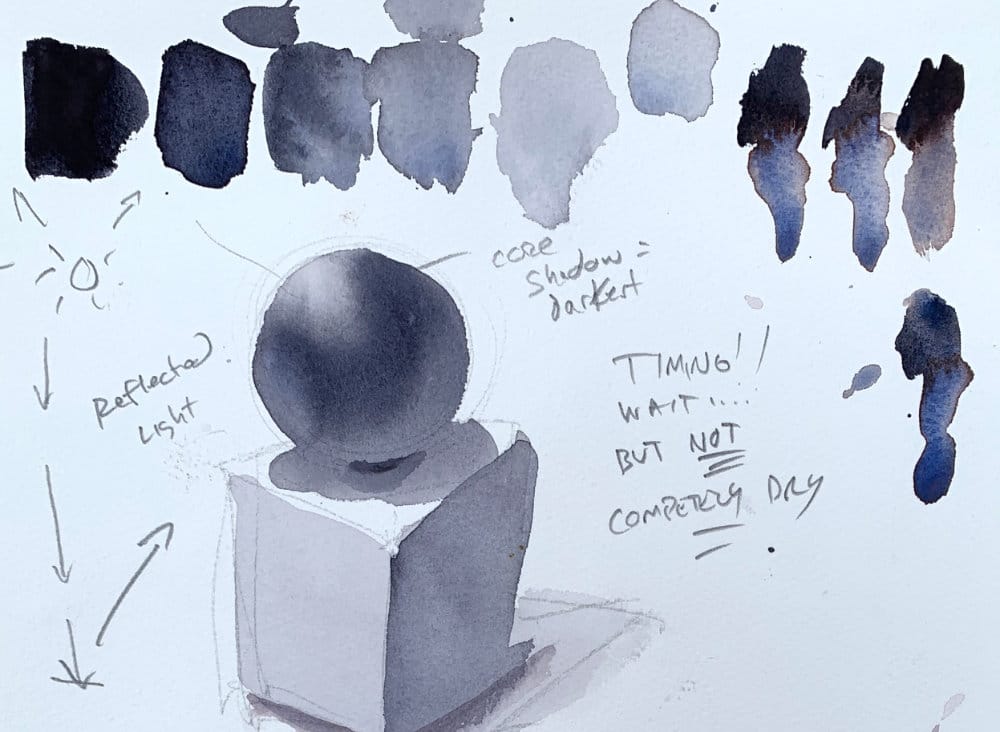
Demo 1: Gray Sphere and Cube
Step 1: Drawing Your Subjects
Using your 4B graphite, lightly sketch your sphere and cube. Just like I learned to use light touches when handling delicate equipment on the boat - no need to press hard. Use an underhand grip for lighter, more controlled strokes.
Step 2: The First Wash
Clean water first to wet the sphere. Here's where my boat experience really kicks in - timing is everything. When you're working on a rocking deck, you can't fight the motion. Same principle applies here: work WITH the water, not against it.
The light source comes from the top left, bouncing in all directions and hitting the surface before bouncing back up. Underneath the sphere, you'll see reflected light - just like moonlight bouncing off ocean waves.
Apply a very light value (first on your scale) to paint the ball and shadows. I can do this because when looking at my subject, the top of the cube and a section of the ball remain white, but everything else gets this light gray foundation.
Step 3: Working Wet-into-Wet
Now here's where it gets interesting - and where those scallop boat lessons really pay off. You have to remember that water is a conduit for pigment. Just like working with unpredictable seas, you have to allow for movement and spreading.
As I add the next value while the surface is still wet, I'm allowing for that natural spreading. The pigment will move, and that's okay - I've learned to anticipate it, just like anticipating how a boat responds to waves.
Step 4: Core Shadows and Timing
Timing is crucial here - wait too long and you'll get watermarks (those dreaded cauliflowers). Don't wait long enough, and your dark pigment runs into your light areas.
This reminds me of timing the swells when transferring scallops - there's a perfect moment when everything aligns, and you have to recognize it and act.
Step 5: Final Details
Once everything is completely dry, add the contact shadows where objects meet. These are typically the darkest shadows - sharp and defined, like the hard shadows cast by equipment on the boat deck.
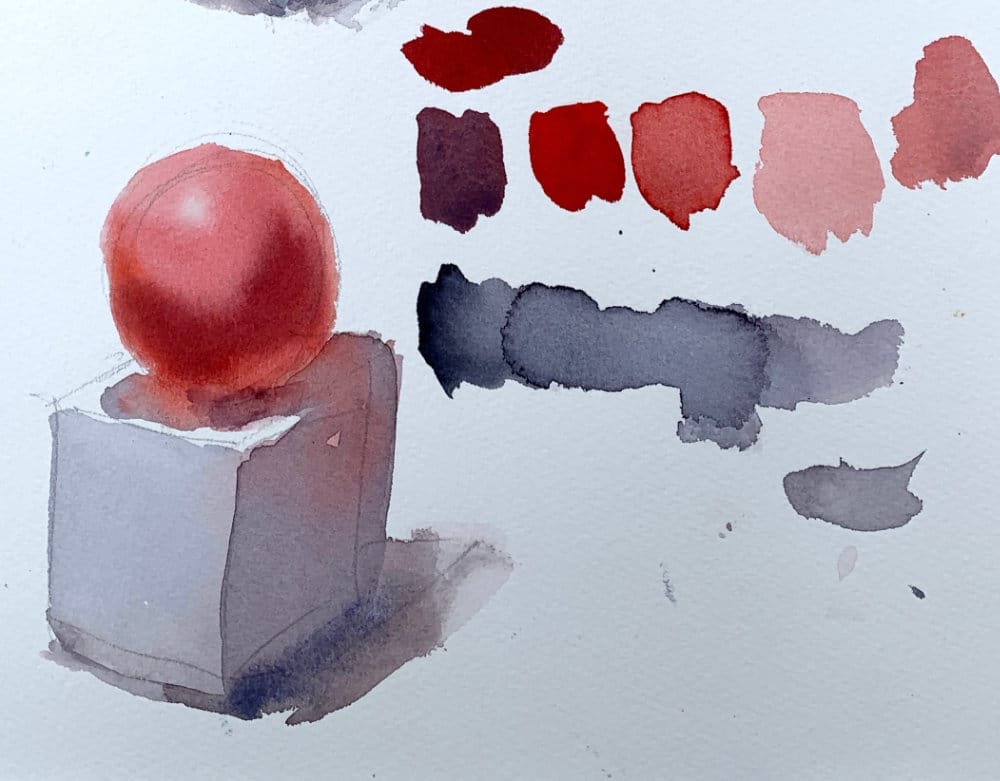
Demo 2: Red Sphere and Cube
Understanding Color Interaction
Now we're working with a red sphere, which adds complexity. Always do a swatch test first - I learned this from mixing paint on boats where you couldn't afford mistakes with limited supplies.
When you have two objects near each other with different colors, they'll influence each other. The red ball will reflect some red into the white cube's shadow - just like how the ocean reflects the sky's colors.
Managing Water and Pigment
Pre-wet the sphere again, but be careful not to use too much water. Those roughneck fishermen taught me that control comes from understanding your medium - whether it's water, paint, or ocean swells.
I tend to leave more space than I think I need around highlights because I've learned from experience that I usually come up short. Know your tendencies and plan accordingly.
Reflected Light and Color Bouncing
Look for that subtle reflected light on the bottom of the red sphere - light coming down, hitting the surface, and bouncing back up. It's the same principle as sunlight hitting water and reflecting onto the underside of the boat's hull.
Layering for Depth
Allow the first layer to dry completely, then stack your darker values on top. This is exactly like the methodical approach we used on the boat - one task at a time, each one building on the previous work.
Key Takeaways
After years of working in unpredictable conditions - whether on a scallop boat or at an easel - I've learned these essential principles:
Patience Pays Off: Just like waiting for the right conditions to haul nets, waiting for your watercolor layers to dry completely prevents muddy, overworked paintings.
Work With, Not Against: Fighting the medium never works, whether it's ocean currents or watercolor flow. Learn to anticipate and guide rather than control.
Observation is Everything: Those long nights on the water taught me to really see light and shadow relationships. The same careful observation applies to capturing form in your paintings.
Less is More: Minimal brush passes create cleaner results - both in efficient boat work and watercolor technique.
Practice Suggestions
Start with these simple shapes before moving to complex subjects. Try painting the side of an apple or delicate flower petals once you've mastered spheres and cubes.
Remember to start with lighter values and gradually build to darker ones. This creates depth and dimension that makes your paintings come alive.
Continue Learning
👉 Next stop: the Watercolor Tutorials Hub to keep building your skills.
Materials You’ll Need
Here are the materials I use all the time and have for decades. I only buy from Blick Art but feel free to shop where you prefer.
Recommended Watercolor Materials
-
Holbein Professional Watercolor Paints – 8 Essential Hues
Yellow Ochre, Cadmium Lemon Yellow, Ultramarine Blue, Cerulean Blue, Alizarin Crimson, Cadmium Red Light, Neutral Tint, Burnt Sienna -
Fabriano Artistico Watercolor Paper – 140lb Cold Press
Buy full sheets and cut into quarter sheets for best value -
Silver Jumbo Wash Brush
Great coverage, excellent quality for the price -
Princeton Neptune Point Rounds (No. 12 & 6)
Reliable and affordable detail & wash brushes -
Princeton Neptune Dagger (1/2")
Versatile size for lines, edges, and detail work -
Masterson Aqua Pro Palette
Durable, with deep wells for generous mixing space -
Gator Board
Lightweight, long-lasting painting support board -
Holbein White Gouache
Optional for highlights and fine details - Miscellaneous: plastic water containers, paper towels, masking tape
This post contains affiliate links. If you make a purchase through these links, I may earn a commission at no extra cost to you.
Ready to try this shading technique yourself? I'd love to see your results! Share your practice pieces and let me know how these steady-hand techniques work for you.