How to Paint Trees for Beginners Part 2
Add sky holes and refine your tree painting with this easy acrylic landscape lesson for beginners. Simplify shapes, balance color, and control edges.

In the first tree painting lesson, we learned how to simplify a tree into large shapes and balance sky holes without over-rendering. In this session, we’ll keep building on that idea — adding sky color, refining the ground plane, and adjusting the tree’s vertical planes to bring more depth and variety to your acrylic tree painting.
This lesson is part of the Acrylic Landscape Painting Fundamentals Course
Adding the Sky and Sky Holes
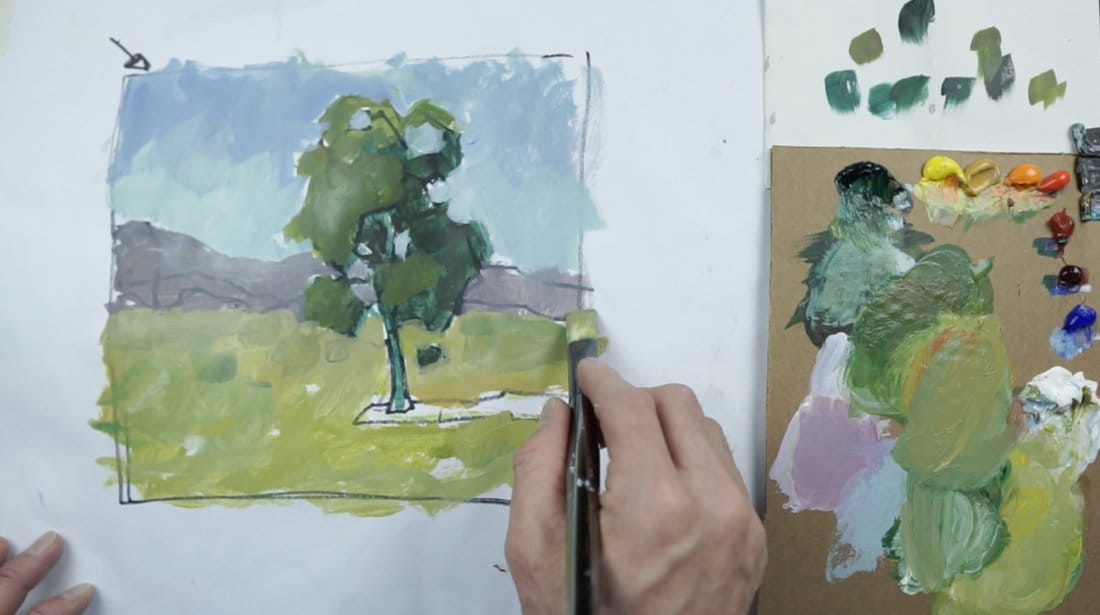
Now that the tree is blocked in, it’s time to paint around it and establish the sky.
I start by mixing a light, neutral blue — using Cobalt Blue and a touch of Viridian — to create a clean base color.
As you paint the sky, remember this: the sky is never flat. I like to push a little gradation, deepening the blue toward the top of the composition and softening it near the horizon. This gives your tree room to breathe and keeps the painting from feeling static.
You can even drag a bit of that blue into some of the sky holes we created earlier. Think of this as negative painting — defining the edges of your leaves and branches by carefully painting the space around them.
Keeping the Brushwork Dry and Controlled
When learning how to paint trees for beginners, brush control makes a big difference.
I use a fairly dry brush here so the paint doesn’t get shiny or slippery. It’s easy to lose control if your paint is too slick, so use a touch of medium if needed but keep it minimal.
Dry brushwork also adds a bit of natural texture that helps suggest foliage.
Simplifying the Background
Once the sky is established, I simplify the background shapes.
In the early sketch, there were a few distant trees and hills, but now I reduce them to a single, soft ground plane. A busy background can distract from your main tree, so think “less is more.”
I warm the lower area slightly by adding a bit of Cad Red Light into the mix — just enough to suggest soil or low vegetation without competing with the main form.
Ground Plane and Shadows
The ground plane helps anchor everything. I paint a light red-green mix into the base to show where the tree meets the ground.
Then I add a cast shadow — cool it slightly with blue or Viridian — to make the tree feel solid and connected to the earth.
Once that’s in, I darken the vertical plane of the tree just a touch. A few deeper values inside the canopy help separate light from shadow and add structure.
Refining the Block-In
At this stage, I’m not worrying about detail. This is still the block-in stage — just refined.
We’re shaping edges, pushing color temperatures, and gently redesigning the sky holes to improve rhythm. The goal isn’t realism; it’s readability.
Key Takeaways
- Paint the sky and sky holes together for cleaner edges
- Keep brushwork dry for better texture control
- Simplify the background into a soft, unified plane
- Warm and cool the ground plane for depth
- Refine light and shadow, not details
Course Navigation
Next Lesson: How to Paint Trees or Beginners Part 3
Previous Lesson: How to Paint Trees Part 1
Continue the Course: Acrylic Landscape Painting for Beginners
Learn & Improve Your Acrylic Skills
- Acrylic Hub– Your go-to guide for tutorials, tips, and resources.
- Ultimate Beginner Acrylic Course - Start painting with confidence.
- Subscribe for More Great Content - Get tutorials, tips, and updates straight to your inbox.
- Follow Me on Pinterest - Daily inspiration, tips, and fresh ideas.
Recommended Acrylic Painting Materials
-
Princeton Catalyst Brushes – Flats (#6, #12), Rounds (#4, #8), Fan (#4), Liner Brush
Durable synthetic bristles for versatile acrylic techniques -
Liquitex Heavy Body Acrylic Paint – Essential Colors
Cadmium Yellow, Yellow Ochre, Alizarin Crimson, Cadmium Red Light, Ultramarine Blue, Cobalt Blue, Burnt Sienna, Titanium White -
Winsor & Newton Cotton Canvas
Reliable stretched canvas for studio and plein air work -
Strathmore 400 Series Mixed Media Paper
Heavyweight, acid-free paper for acrylic and mixed media -
Fabriano Artistico 140lb Cold Press Paper
Excellent for acrylic, mixed media, and textured effects -
Blick Multi-Colored Painting Knife Set
Variety of shapes for texture, scraping, and bold strokes - Miscellaneous: Two pint-sized water containers, paper towels (from Home Depot or Walmart)
- Note: I use canvas or sturdy cardboard as my palette — no store-bought palettes needed.