How to Draw a Skull Profile: Step-by-Step Demonstration
Put theory into practice with this skull profile drawing demonstration. Learn how to apply the egg and square method, draw at multiple scales, work in both directions, and use the division method for accurate proportions. Includes practice assignment for building strong foundational skills.


Now that you understand the proportions and structure from the previous lesson, let's put it into practice. In this demonstration, I'll draw skull profiles multiple times using the egg and square method, showing you how to vary sizes and directions to build good habits from the start.
Want drawing lessons? Visit the Free Drawing Tutorials & Courses hub →
What You'll Learn
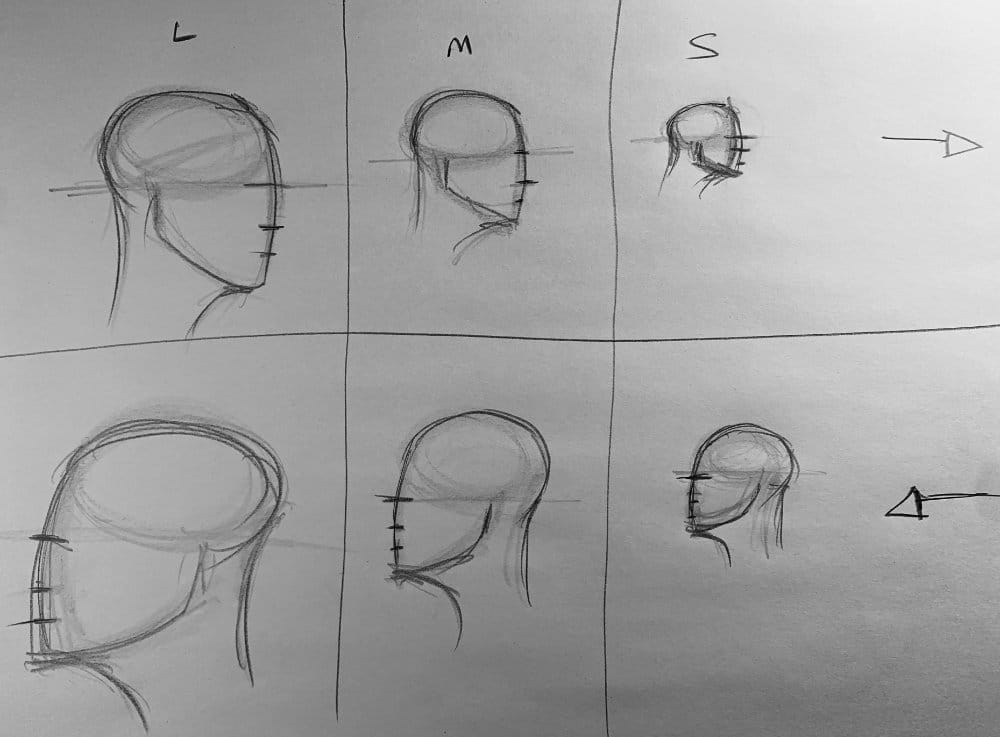
- How to apply the egg + square method when actually drawing
- Drawing at different scales (large, medium, small) to avoid bad habits
- Drawing both directions (left and right facing) for versatility
- Using the division method to place features accurately
- Keeping your construction lines light for refinement later
Video Demonstration
Applying the Two-Shape Method
Starting with the egg shape for the cranium, I bring down the mask of the face, keeping those proportions in mind - the front is slightly longer than the width of the skull. Once that's in place, I add the neck (front and back), locate the eye line, bottom of the nose, and the lower lip edge using the division method.
Why Multiple Sizes Matter
One of the biggest mistakes beginners make is drawing the same size every time. You don't want to get into a routine where all your heads look the same because they're all the same scale.
Drawing large, medium, and small versions trains you to understand the proportions at any size, not just memorize one comfortable scale.
Why Both Directions Matter
The same applies to direction. You don't want to only understand how to draw something one way. By practicing both left-facing and right-facing profiles, you're building versatility from the beginning instead of having to break bad habits later.
The Division Method in Practice
From the eye line down to the chin, divide that space in half to find the base of the nose (where it meets the mouth). Then divide that remaining space in half again to find the edge of the lower lip. This simple division system works at any scale.
Keep Your Lines Light
I'm using a 9B Lyra pencil and going darker so you can see what's happening in the video. But when you're drawing, always keep your construction lines lighter so they can be refined later. These are guidelines, not final lines.
This is Structure Practice, Not Finished Art
Notice these aren't detailed, finished skulls. We're practicing the underlying structure - the foundation. As we progress in this course, we'll add details and refinements, but right now we're building the structural understanding that makes everything else possible.
Your Practice Assignment
Draw at least 12 skull profiles using this method:
- 3 large, 3 medium, 3 small (all facing right)
- 3 large, 3 medium, 3 small (all facing left)
Focus on:
- Accurate proportions (face longer than skull width)
- Proper division method for features
- Varying your scales
- Keeping lines light for refinement
Don't worry about details yet - just nail the structure.
Continue Learning
- Previous: Skull Profile Proportions & Structure
- Next: Skull Front Proportions
- Visit the Head Drawing Hub for a complete list of available lessons
Part of the Head Drawing Complete Course - 60+ free lessons
Continue Learning
If you enjoyed this hand drawing course, explore even more lessons on our Free Drawing Tutorials & Courses Hub — including the complete How to Draw – Beginner’s Course.
Want new tutorials delivered to your inbox? Subscribe here and get free lessons, tips, and inspiration sent directly to you.