How to Draw a Skull Front View: Thirds and Halves Methods
Apply the thirds and halves methods with this skull front view drawing demonstration. Watch six examples showing both techniques at large, medium, and small scales. Practice varying sizes and methods to build versatile skills for portrait drawing.

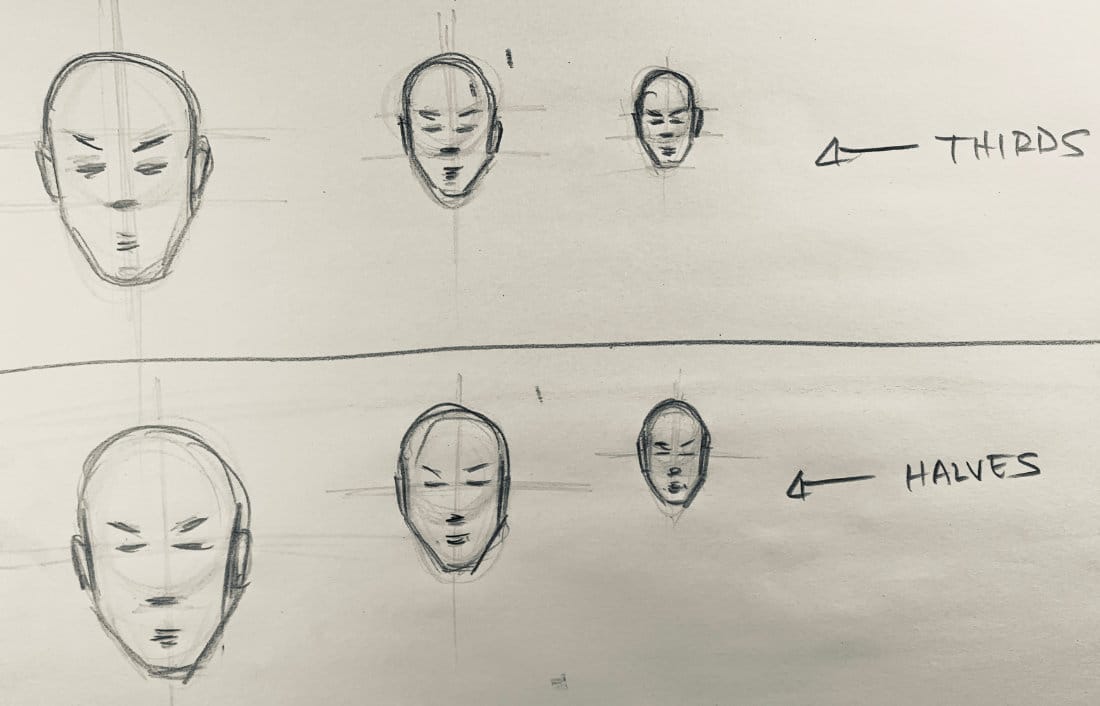
Now that you understand the 2:3 ratio and feature placement from the previous lesson, let's put both methods into practice. In this demonstration, I'll draw six skull front views - three using thirds, three using halves - at different scales to build good habits from the start.
What You'll Learn
- How to apply the thirds method when actually drawing
- How to apply the halves method when actually drawing
- Drawing at three different scales (large, medium, small)
- Keeping construction lines light for refinement
- Comparing both methods to find what works for you
Video Demonstration
Starting with the Thirds Method
Beginning with a circle for the cranium, I add an ellipse below it, watching for that 2:3 ratio. Once the proportion looks right, I add the center line and divide the shape into thirds using the top circle as my guide - dividing it in half, then marking a line at the bottom.
The ears go in the middle third. The eyebrow arch sits near the top third line. Eyes go just below that. The bottom third line marks the nose base, and dividing the space below that in half gives me the lower lip.
Why Three Sizes Matter
Drawing the same size every time creates a crutch. When you paint, you'll draw faces at different scales constantly. Practicing large, medium, and small versions trains you to understand proportions at any size, not just memorize one comfortable scale.
Moving to the Halves Method
Same start - circle plus ellipse. But instead of thirds, I divide the total length from top to bottom in half. That halfway line marks where the eyelids meet. Eyebrows sit just above.
From the eyes to chin, divide in half - that's the nose base. From nose to chin, divide in half - that's the bottom of the lower lip. Simple, effective, different approach to the same result.
Light Lines First, Dark Lines for Clarity
I'm using a 2B for construction, then going over with a 9B Lyra so you can see the structure clearly in the video. When you draw, keep those construction lines light. They're guides, not final lines. You'll refine them later.
The Sides Flatten
Notice the straight lines on the sides of the face where the circular shape disappears. This happens just above the ears down to where the jaw begins. Every model varies, but this subtle characteristic shows up consistently.
Experiment with Both Methods
Some artists prefer thirds, others halves. Many merge both approaches. The key is experimenting to find what clicks for you. Both work. Both are quick. Both give you accurate proportions.
Your Practice Assignment
Draw 12 skull front views:
- 3 sizes using thirds method (large, medium, small)
- 3 sizes using halves method (large, medium, small)
- Repeat the set one more time
Focus on:
- Accurate 2:3 ratio (rectangular, not square)
- Proper egg shape (wider top, narrow chin)
- Clean division lines
- Varying your scales
- Light construction lines
Continue Learning
- Previous: Skull Front View Proportions & Theory
- Next: Neck Anatomy and Construction
- Course Hub: Complete Head Drawing Course
Continue Learning
If you enjoyed this hand drawing course, explore even more lessons on our Free Drawing Tutorials & Courses Hub — including the complete How to Draw – Beginner’s Course.
Want new tutorials delivered to your inbox? Subscribe here and get free lessons, tips, and inspiration sent directly to you.