How to Draw Head Angles: Use the Ear as Your Secret Weapon
The ear is your secret weapon for drawing head angles. Learn three methods - sail, cube, and cylinder - for quickly showing heads tilting up, down, and rotating. Master ear placement and nail every angle.


Here's something most head drawing tutorials don't tell you: the ear is basically a GPS for head angles. Seriously. Move the ear, and suddenly the whole head is tilting, turning, looking up or down. It's almost too easy.
Want drawing lessons? Visit the Free Drawing Tutorials & Courses hub →
Watch video: hit play and learn various methods for drawing the head.
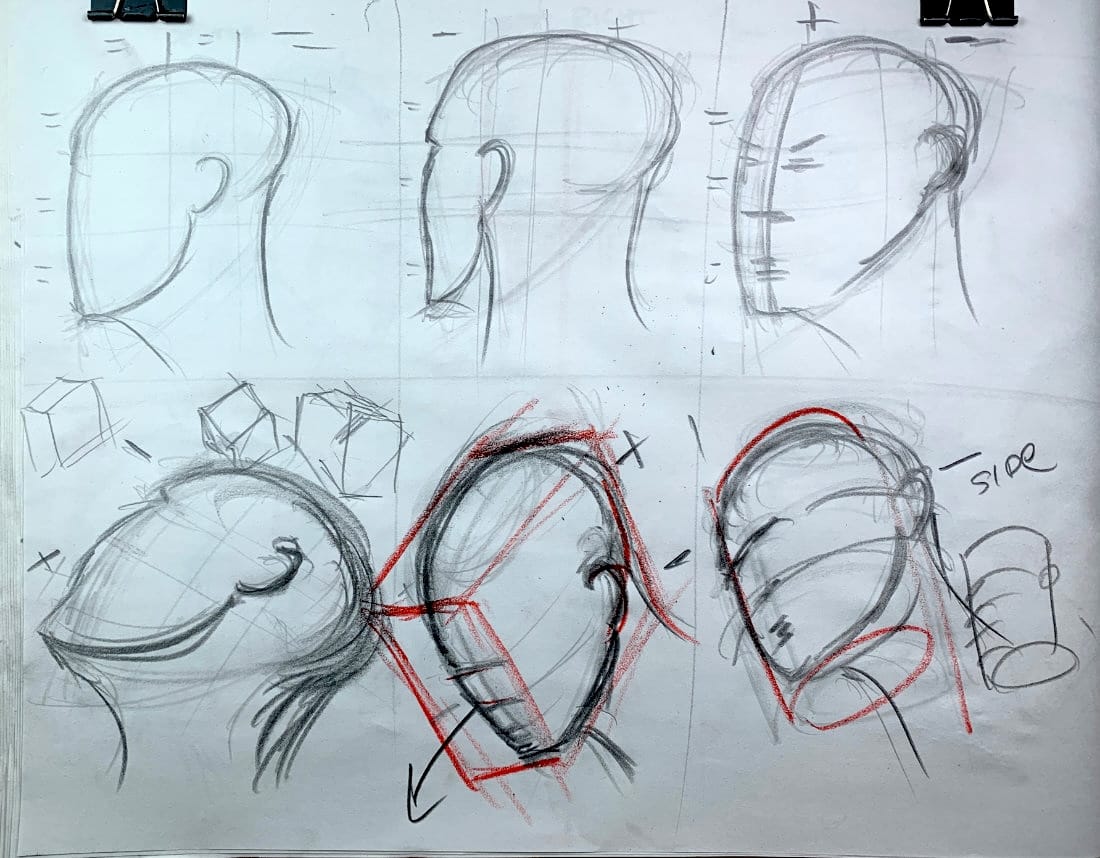
The Upside Down Sail Method
Start with your profile setup - that upside down sailboat shape we've been using. Divide it into thirds like a tic-tac-toe grid.
- Remember: the ear lives in that middle square.
- When the head is straight on (no angle), all the squares are equal. Easy.
But here's where it gets interesting.
Turning the Head Away
Same setup, but now make the left square smaller and the right square bigger. Keep the ear in that middle square - but because the square shifted, the ear moved too.
Boom. The head just turned away from you.
The face features? Hidden. The ear? Pushed toward the back of the skull. Your viewer instantly reads "this person is looking away."
Turning the Head Toward You
Flip it. Make the front square bigger, back square smaller. The ear shifts toward the back of the head, and suddenly you're seeing more facial features.
Same basic structure. Just shifted proportions.
Looking Up
Keep the top of the skull divided evenly. Now change the mask of the face - put more space toward the bottom.
This pushes the ear up toward the top of the skull. Instant "looking up" angle.
You'll see more under the chin. The ear sits high. The whole thing reads as tilted back.
Looking Down
Opposite game. Less space at the bottom, more volume at the top of the skull. The ear drops down.
Now the head is tilting toward you. You see more of the top of the head.
The One-Idea Rule
Whether you took my gesture drawing class or not, this applies: always look for ONE clear idea that shows what the pose is doing.
With portraits, it's the same deal. The ear placement IS that one idea. It tells you everything about the angle in a split second.
Alternative Method #1: The Cube
Having trouble visualizing the angle? Stick the head in a box.
Literally draw a cube. Now rotate that cube however you want - you can see the top, the side, whatever. Much easier to understand the 3D space.
Once the cube makes sense, the head angle makes sense.
Alternative Method #2: The Cylinder
Instead of the sail, use a tube. Run rings around it like you're wrapping string.
Want the head tilting away? Put the ear toward the top of the tube.
Looking up at the figure? Put the ear toward the bottom, show more of the top of the tube.
The facial features go on one side (usually the front), the ear goes on the opposite side.
Front and Side Matter
Even with round shapes like cylinders, you need a clear front and a clear side. The face features on the front, the ear on the side.
Keep those separated and the whole thing reads correctly.
Mix and Match Methods
Use the sail for some angles. Use the cube when you need to see the 3D space clearly. Use the cylinder when it clicks better.
You might even combine them. Or tweak them. Or create your own version.
The point is having options. Some angles work better with certain methods.
What We're NOT Worried About
Details. Features. Perfect rendering.
This is layout work. You're getting the structure down fast so you can move forward.
Is the head turning? Tilting? Both? Get that down with the ear placement and you're golden.
Your Practice Assignment
Try all three methods and see what clicks:
Sail Method:
- Draw a head turning away (ear toward back)
- Draw a head turning toward you (ear toward front)
- Draw a head looking up (ear high)
- Draw a head looking down (ear low)
Cube Method:
- Sketch a few cubes at different angles
- Add basic head features to see how it works
Cylinder Method:
- Draw a tube tilting away (ear toward top)
- Draw a tube tilting toward you (ear toward bottom)
Label everything. Seeing "turning away" or "looking up" written on your sketch helps lock it in.
The Big Takeaway
The ear isn't just something you stick on the side of the head at the end. It's a positioning tool that tells you exactly what angle you're working with.
Master ear placement, master head angles. Simple as that. 🎯
Continue Learning
- Previous: How to Draw Back of the Head Demonstration
- Next: Back of Head Drawing Demo (coming soon)
- Course Hub: Complete Head Drawing Course
Continue Learning
If you enjoyed this hand drawing course, explore even more lessons on our Free Drawing Tutorials & Courses Hub — including the complete How to Draw – Beginner’s Course.
Want new tutorials delivered to your inbox? Subscribe here and get free lessons, tips, and inspiration sent directly to you.