How to Draw: Free Beginner Drawing Course & Lessons (Step by Step)
Learn how to draw with this complete free beginner drawing course (2h 45m). Step-by-step lessons cover line control, shading, perspective, and measuring — perfect for sketching beginners who want a strong foundation.


If you’ve ever wondered how to draw, this complete free drawing course for beginners is the perfect place to start. In this 2 hour 45 minute lesson series, you’ll learn the essentials: line control, shading, perspective, and measuring. These beginner drawing lessons are designed for anyone — whether you’re sketching for beginners, picking up a pencil for the first time, or refreshing the basics you learned years ago.
A Story About Risk & Reward
Back in 2020, during COVID, my wife and I were searching for a home. She was nine months pregnant, we had two kids in tow, and we’d been driving hours around Richmond looking at houses. Every time we put in an offer, someone beat us with cash. We were exhausted and ready to give up.
One day, our realtor suggested one more showing — a house in Goochland, nearly 40 minutes away. My wife was done: “If it has a roof, let’s just buy it.” But something told me to roll the dice.
We drove out, pulled in the driveway, and instantly knew it was right. We made an offer, and five years later, that “risk” paid off — the house has gained over $200,000 in value.
Why This Story Matters for Drawing
Starting a new skill — like drawing — can feel the same way. You’re not sure if the investment of time will pay off. But just like that house, the fundamentals in this beginner drawing course will appreciate in value for the rest of your creative journey.
This course gives you the foundation: hand–eye coordination, value shading, perspective, and measuring. Master these basics and you’ll be able to create sketches, drawings, and paintings with confidence.
Want more lessons? Visit the Free Drawing Tutorials & Courses hub →
Watch video: Hit play and learn to draw now. You can scroll below to see section breakdowns and timestamps if needed.
How to Draw video
0:00 – Beginner Drawing Lessons: Basic Line Exercises (Part 1)
- Loose underhand grip; draw from the shoulder (not the wrist)
- Connect dots in eight directions (L→R, R→L, T→B, B→T, both diagonals)
- Vary pressure for light/dark line quality
👉 These simple drills improve hand–eye coordination, build control, and set the foundation for confident strokes in every drawing you’ll make.
9:39 – Beginner Drawing Lessons: Basic Line Exercises (Part 2)
- Longer strokes, page rotation for visibility
- Short vs. long lines; accuracy and consistency drills
👉 This stage develops steadiness and accuracy. It helps beginners overcome shaky lines and learn to move fluidly across the page.
20:51 – Beginner Drawing Lessons: Basic Line Exercises (Part 3 — Value)
- Value with line (vertical, horizontal, diagonal fills)
- Long-rectangle “endurance shading” for stamina
👉 Practicing value through lines teaches you how pressure creates depth. It also builds stamina, so shading larger drawings won’t feel overwhelming.
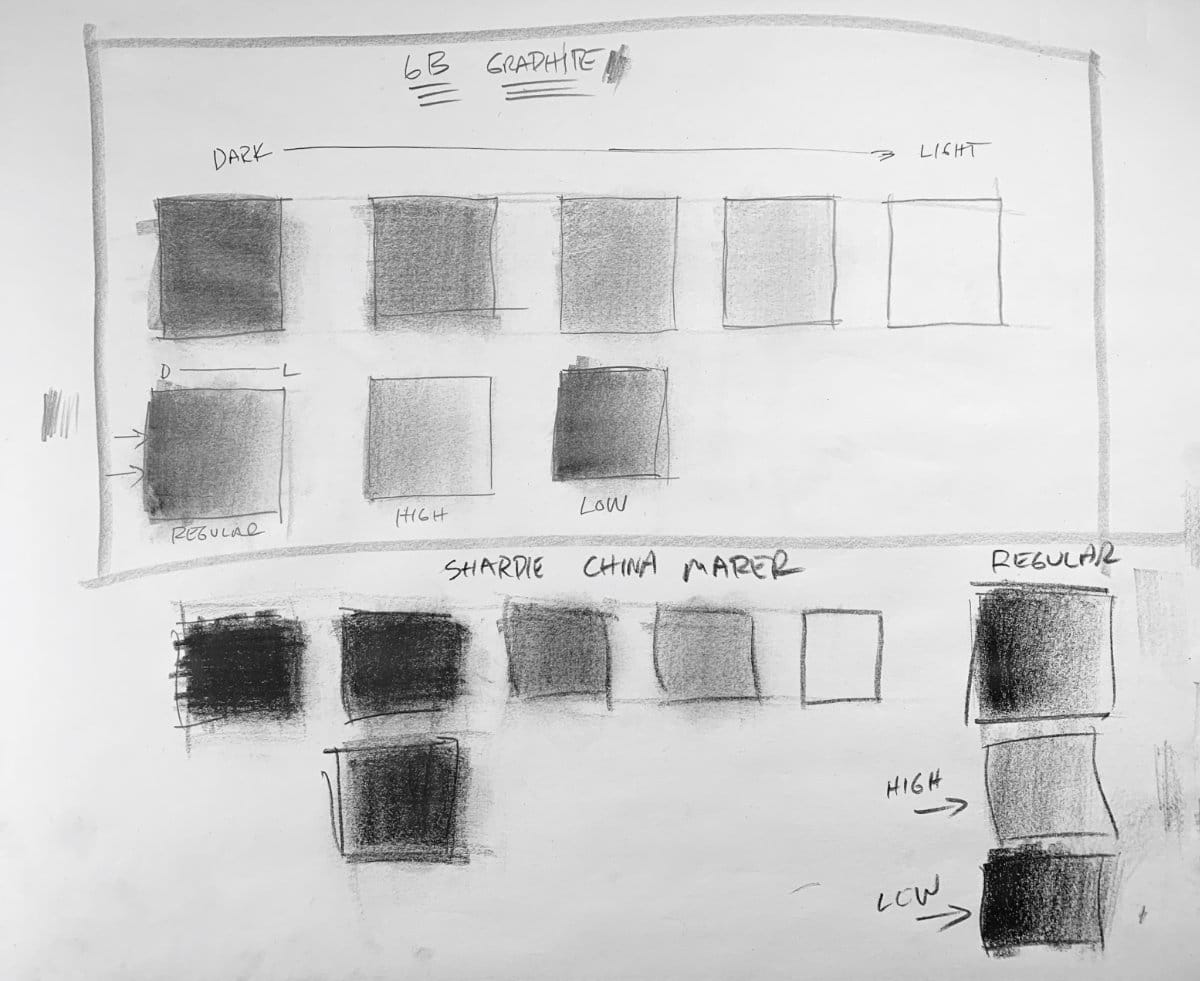
23:19 – Value Assignment (Beginner Drawing)
- Build a five-step value scale for each material (graphite, charcoal, china marker)
👉 A value scale trains your eye to recognize subtle shifts from light to dark. It’s a roadmap for realistic shading.
24:14 – Shading & Value Drawing for Beginners (Gradients)
- Regular (full range), high-key (compressed lights), low-key (compressed darks)
- Blending options (layered passes, tissue/paper towel)
👉 Gradient exercises teach smooth transitions. You’ll learn how to control tone and create atmosphere in your sketches.
42:19 – Value Exercises Assignment (Shading Practice)
- Multiple gradient squares per material; compare handling, layering, and blendability
👉 By testing different materials side by side, you’ll understand how tools behave. This makes it easier to pick the right medium for the effect you want.
43:14 – Visual Components of Drawing (2D Shapes → 3D Forms)
- Circles→spheres, squares→cubes, cylinders→tubes
- Contours, ends, corners; depth, proportion, and composition choices
👉 Turning flat shapes into 3D forms is the gateway to drawing everything—people, objects, and environments.
1:00:38 – Perspective Drawing with Basic Shapes (Horizon & Vanishing Points)
- Eye line (horizon) and vanishing points
- Above/at/below eye level; tilt the horizon for dynamic views
👉 Perspective lessons help you place objects in believable space. They make your drawings look structured and alive, not flat.
1:24:02 – Perspective Drawing Recap (Beginner-Friendly)
- Reinforce VP principles on simple forms before complex subjects
👉 A quick review to lock in perspective before moving on ensures you won’t feel lost when drawings get more advanced.
1:29:46 – How to Measure in Drawing (Beginner Proportions)
- Pencil-as-ruler method: lock elbow/wrist, one-eye alignment, thumb for lengths
- Compare proportions; capture/transfer angles accurately
👉 Measuring teaches accuracy. It keeps your drawings in proportion, so what’s on your page actually matches what you see.
Why Take a Free Drawing Course?
Learning how to draw doesn’t have to be expensive or complicated. This free drawing course for beginners will guide you step by step through the essentials: line control, shading, perspective, and measuring. Whether you’re sketching for beginners, picking up a pencil for the first time, or refreshing your fundamentals, these lessons will help you build the foundation every artist needs.
Where to Go Next — Fun & Relaxing Drawing Tutorials
Now that you’ve got the fundamentals down, here are some creative exercises to loosen up your line work and add more personality to your sketches:
- Beginner's Guide to Contour and Blind Contour Drawing – Train your eyes and hands to work together with this classic artist’s exercise.
- Beginner’s Guide to Negative Space Drawing Techniques – Learn to see shapes differently and sharpen your accuracy by focusing on the spaces between objects.
- Try These Fun Drawing Exercises to Improve Your Skills – Quick, enjoyable drills you can do anytime to boost confidence and control.
- Elevate Your Drawing Skills with this Semi-Blind Contour Exercise – A playful twist on contour drawing that builds line quality and observation skills.
Bookmark this page and return to the video lessons as often as needed. Each time you watch, you'll notice new details and insights that will advance your skills.
Share this free drawing course with anyone who wants to learn. Art education should be accessible to everyone.