How to Draw a Coffee Cup | Beginner Drawing & Shading Project
Learn how to draw a coffee cup step by step in this beginner-friendly project. Start with basic shapes, then add shading to make your sketch look three-dimensional. Perfect practice for sketching beginners.

In this beginner drawing lesson, you’ll learn how to draw a coffee cup step by step. We’ll start by breaking it down into simple shapes, then add shading to make it look three-dimensional. This project builds directly on the fundamentals taught in the Free Beginner Drawing Course.
I get it — you want to start big (who doesn’t?). But starting small with simple subjects, like a coffee cup, helps you build the solid foundation you’ll need for more complex drawings later. To get the most out of this lesson, be sure to watch, pause, and draw along with me.
👉 Watch the video: hit play and begin the step-by-step coffee cup drawing lesson.
Beginner drawing video - Coffee Cup project
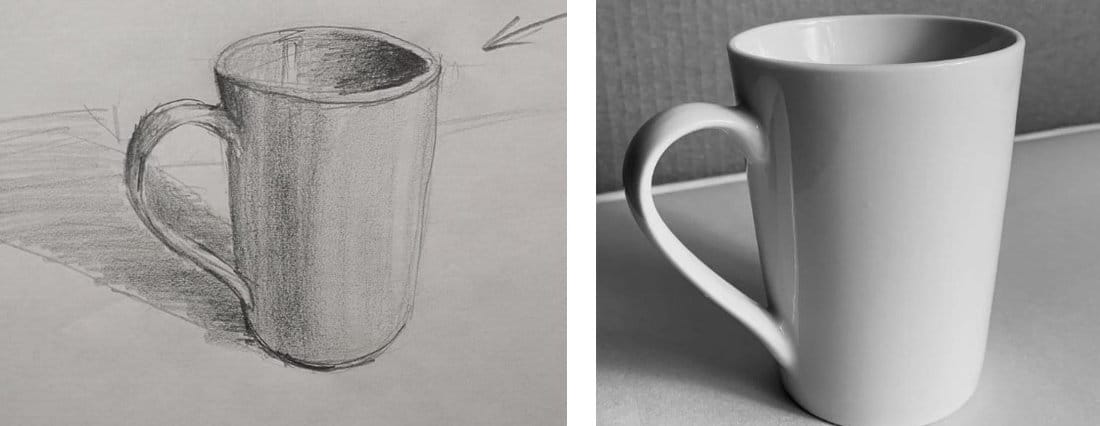
Step 1 – Block In the Basic Shapes
The coffee cup is easiest to construct from cylinders and ovals. Begin by sketching a vertical axis line to keep proportions aligned. Use light HB pencil strokes to rough in:
- The top oval (opening of the cup)
- The bottom oval (base, slightly smaller)
- A vertical axis running through the center
👉 Benefit: Thinking in 2D → 3D forms teaches you how to simplify complex objects into manageable shapes .
Step 2 – Measure Proportions
Hold your pencil up to compare height vs. width. In this demo, the cup’s width is about ⅔–¾ of its height. Mark the top and bottom, then refine the oval so it fits proportionally.
👉 Benefit: Measuring helps you place objects accurately, so your drawing “feels right” on the page .
Step 3 – Add the Handle
The handle starts as a simple rectangle with volume, then bends around in perspective. Think of it as “half a heart” attaching to the side of the cylinder. Keep the width consistent, and sketch through the form so it looks like it wraps around the cup.
👉 Benefit: Practicing perspective curves improves your ability to attach parts convincingly to main forms .
Step 4 – Indicate Thickness
Coffee cups aren’t paper-thin — add a slight lip at the top edge and thickness to the body. Use ovals and parallel lines to show the inner and outer walls.
👉 Benefit: These subtle details create a sense of realism and volume .
Step 5 – Begin Shading
Identify your darkest darks (inside the handle, under the rim) and lightest lights (reflections along the side and top edge). Use directional strokes that follow the cup’s curve to reinforce form.
- Shade the body in gradual gradients
- Keep the highlight strip clean
- Darken the cast shadow beneath and beside the cup
👉 Benefit: Shading not only creates depth but also teaches you how light wraps around cylindrical forms .
Step 6 – Refine with Cast Shadows & Highlights
Add cast shadows that fade as they move away from the cup. If needed, lift graphite with an eraser to pull back highlights or add contrast.
👉 Benefit: Working with both light and shadow control improves realism and gives your sketches more presence .
Why This Coffee Cup Project Matters
This lesson ties together forms, perspective, and shading in one exercise. By completing it, you’ll:
- Strengthen your measuring skills
- Practice drawing cylinders and ellipses
- Gain confidence shading rounded forms
- Learn to add small details (handles, lips, thickness)
Next Steps
Ready to keep building skills? Try the other beginner drawing projects:
👉 How to Draw a Tube of Paint → Use forms and shading for three-dimensional study
👉 How to Draw a Hammer → practice basic shapes & forms and shading skills
👉 Or return to the Free Beginner Drawing Course