How to Draw Cars: The Foundation Every Artist Needs
Forget starting with headlights and details. This systematic car drawing method teaches you to see vehicles as 3D forms in space first. Real teaching methodology that works for any car, any angle. Includes measuring techniques and step-by-step foundation approach

Listen, I get it. You see a car and think "I'll just start drawing cars starting with the headlight, add the grill, maybe work on that windshield..." and before you know it, you're staring at a wonky mess that looks more like a confused refrigerator than a vehicle.
Here's the thing that's going to change everything for you: stop looking at details first.
I've been teaching this stuff for years, and I see the same mistake over and over. Artists jump straight to the "fun parts" - the chrome, the headlights, the fancy curves - without understanding how that car is actually sitting in space. And that's exactly why most car drawings look flat, distorted, or just plain wrong.
Today I'm going to show you the foundational approach that works for any car, any angle, any perspective. Once you get this, you'll look at vehicles completely differently.
Want more drawing lessons? Visit the Drawing Tutorials & Courses hub →
Watch video: Hit play and discover drawing tips that work on more than just cars. Be sure to scroll down to see entire car drawing series including assignment reel and my take on assignment.
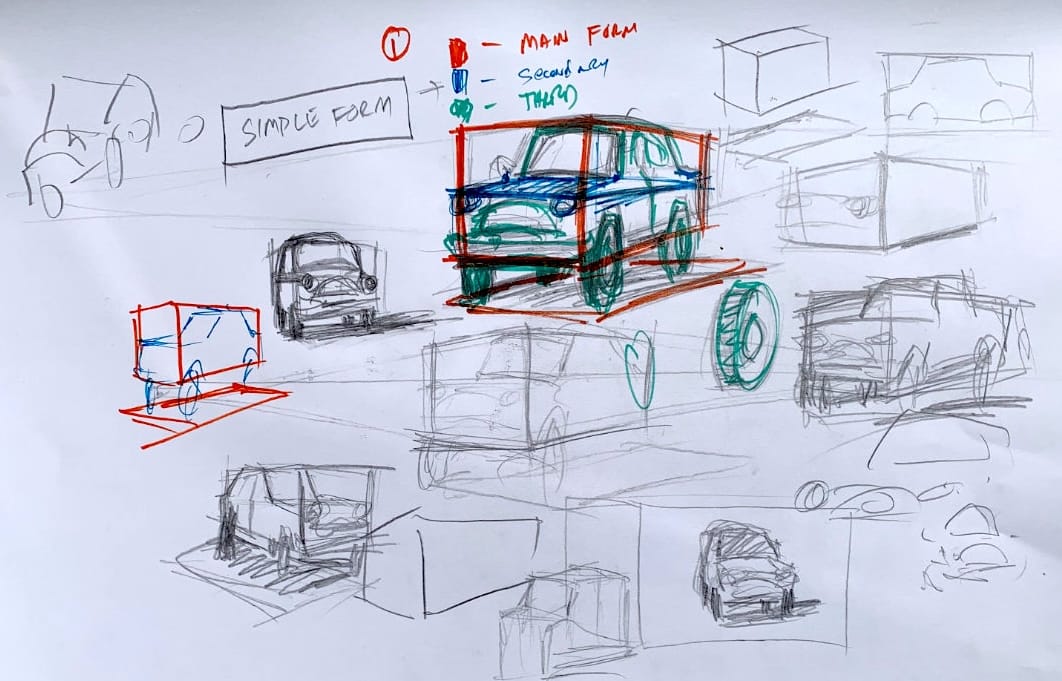
The Big Secret: It's All About Basic Shapes
Before we dive in, let me show you what I mean. Look at any car - doesn't matter if it's a sleek sports car or a beat-up pickup truck - and it's basically a three-dimensional rectangle moving away from you in space.
That's it. That's the foundation.
I know it sounds almost too simple, but this is what separates artists who can draw convincing cars from those who struggle. You need to see that underlying structure first, then build everything else on top of it.
Step 1: Find Your Closest Corner
Here's where we start getting practical. Look at your car photo and ask yourself: which corner is closest to me?
We're not looking at the car straight-on from the side (that would be boring and flat). We're seeing it in perspective, which means there's always going to be one corner that's closer to us than the others.
In my demo here, that front corner with the headlight? That's our closest point. Everything else moves away from there.
Step 2: The Pencil Measuring Technique
This is where most artists get lazy, but trust me - this step will save you hours of frustration later.
Hold your pencil up to the image. I'm serious - actually do this. Use it like a measuring stick to figure out:
- The angle of the bottom edge - How steep is that perspective?
- Length vs. width relationships - Is the front of the car longer or shorter than the side we can see?
- Where things line up - If you dropped a vertical line from the headlight, where would it hit on the car's body?
When I measured this car, I found that the back section was actually a bit longer than the front. It's not always what you expect, which is why we measure instead of guessing.
Step 3: Build Your Foundation Box
Now we're getting somewhere. Start with that basic rectangular shape - but remember, it's not flat. This is a box in space with:
- A front face (closest to us)
- A side face (moving away)
- A top (which we might barely see, depending on our eye level)
The key is understanding that these edges aren't random. They're following perspective rules. If we extended those lines long enough, they'd meet at vanishing points way off in the distance.
Don't worry about being perfect here - we're establishing the foundation, not building a blueprint.
Step 4: Add That Floating Shadow
Here's something that really helps visualize the whole thing: imagine your car is floating just above the ground, casting a shadow underneath.
This shadow follows the same perspective as your car box, and it helps you understand that your vehicle isn't just sitting there flat - it's occupying real space in a real environment.
Step 5: Divide and Conquer
Once you have your basic box established, NOW we can start dividing it up. But we're still not jumping to details. Instead, we're finding major sections:
- Where does the hood meet the windshield?
- How much space do the headlights take up?
- Where does the cab of the car begin?
I use my pencil again here, measuring relationships. In this car, the headlight section was roughly half the length of the entire front face. These measurements give me anchor points I can trust.
The Magic Happens: Adding Structure, Not Details
Now I can start adding the major elements, but notice - I'm still thinking about shapes and relationships, not getting lost in chrome details or perfect curves.
The windshield isn't just a random shape - it connects to specific points on my foundation box. The tires aren't just circles - they're ovals that drop down below my main structure and connect to the ground plane.
Even when I add elements like the grill, bumper, or side windows, I'm constantly referring back to my underlying structure. That foundation box is my North Star through the whole process.
Why This Changes Everything
Here's what happens when you work this way: you start seeing cars (and honestly, ANY complex subject) as simple forms first, details second.
That overwhelming complexity melts away because you're not trying to figure out seventeen different things at once. You're just building one simple structure, then adding to it systematically.
Let's Try Another Example
Look at that second car in my demo - it's facing a different direction, but guess what? Same exact process:
- Find the closest corner (front right in this case)
- Measure the relationships (this one shows way more of the front face)
- Establish the foundation box
- Divide it up based on actual measurements
- Add structure progressively
The perspective is different, the proportions are different, but the method stays exactly the same.
What About Getting Loose and Gestural?
I know some of you are thinking, "But Robert, I want my drawings to be loose and expressive, not rigid and mechanical!"
Trust me, I get it. And you absolutely can work loose and gestural - but only if you understand this foundation first.
Look at some of those sketchier cars in my demo page. I can push and play with the forms because I understand what's underneath. I can exaggerate proportions, simplify details, or add expressive line work because I'm not guessing about the basic structure.
But if you try to go loose without this foundation? You'll just be making confident-looking mistakes.
The Universal Principle
Here's the thing that really excites me about this approach: it works for everything.
UPS trucks, motorcycles, boats, buildings, even complex organic subjects - they all start with understanding the basic three-dimensional form and how it sits in space relative to your viewpoint.
Once you train your eye to see these underlying structures, you'll never struggle with "I don't know where to start" again.
Common Mistakes to Avoid
Before we wrap up, let me save you some frustration by pointing out the traps I see students fall into:
Starting with details: If your first marks are headlight shapes or grill lines, you're setting yourself up for problems. Foundation first, always.
Ignoring perspective: That car exists in space, not on a flat piece of paper. Those angles and proportions matter.
Not measuring relationships: Your eye will lie to you, especially when you're focused on making things "look right." Use your pencil, trust the measurements.
Rushing the foundation: I know it's tempting to jump to the "fun stuff," but spend time getting that basic structure solid. Everything else builds on it.
What's Next
You've seen the method, you've gotten the challenge, now you've watched me work through it with all the real struggles included. Links are below in case you mixed the other vids in series.
Complete Car Drawing Series:
- How to Draw Cars: The Foundation Every Artist Needs ← You are here
- The 1-Minute Car Drawing Challenge - Put your skills to the test
- My Take: Teacher Attempts 1-Minute Car Challenge - See how I completed the assignment.
- Student Results & Common Mistakes - Fix common issues in realtime
- Tracking Lines - Students struggled with this observation issue, here's how to fix it
The goal isn't perfection. It's building that visual vocabulary so complex subjects become approachable instead of overwhelming.
The Bottom Line
Drawing cars (or anything complex) isn't about talent or some mysterious artistic gift. It's about understanding structure, using simple measuring techniques, and building systematically from basic shapes to finished drawings.
Master this foundation, and you'll have the tools to tackle any subject with confidence. Skip it, and you'll keep struggling with the same proportion and perspective problems no matter how much you practice.
Start simple. Build systematically. Trust the process.
And remember - every professional artist you admire went through this same learning curve. The difference is they stuck with the fundamentals long enough to make them second nature.
Now get out there and start seeing cars as boxes in space. Your future self will thank you.
Continue Learning
If you enjoyed this hand drawing course, explore even more lessons on our Free Drawing Tutorials & Courses Hub — including the complete How to Draw – Beginner’s Course.
Want new tutorials delivered to your inbox? Subscribe here and get free lessons, tips, and inspiration sent directly to you.
Follow me on Pinterest for more drawing tutorials.
What subjects are you struggling to draw? Drop a comment below and let me know what you'd like me to break down next. And if you try this car drawing approach, I'd love to see your results - tag me on social media or send them my way!