How to Draw the Back of a Head: Step-by-Step Demo
Most artists skip practicing the back view - then panic when they need it. Learn the simple circle method for drawing heads from behind, plus how to show different body types using trapezius muscles and neck proportions.


Here's the thing about drawing heads from the back view - most people never practice it. Then when they need to draw someone from behind, they freeze up.
Let's fix that.
Want drawing lessons? Visit the Free Drawing Tutorials & Courses hub →
Watch video: hit play and learn how to draw back of the head.
The Simple Setup
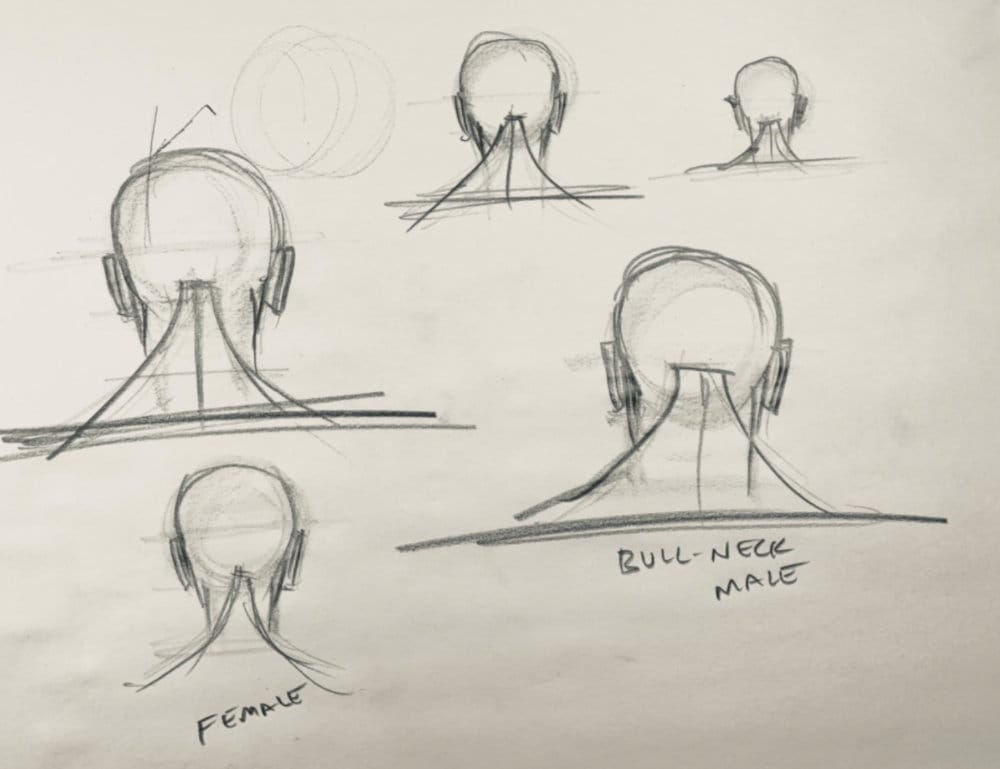
Start with a circle. That's it.
Now divide it in half vertically, draw a line at the bottom of the circle, then add another third below that. This gives you the length of the neck. See? Not complicated.
What You're Actually Drawing
From the back, you're looking at:
- The skull (obviously)
- A hint of the face mask visible on the sides
- The ears
- The neck
- Those trapezius muscles connecting to the shoulders
The trapezius is your secret weapon here. It's what makes the back of the head connect convincingly to the body.
Mix Up Your Sizes
Don't just draw one size and call it done. Go big, go medium, go small.
Why? Because if you only practice at one scale, that's the only scale you'll be comfortable with. And trust me, you'll need to draw heads at all different sizes.
Body Types Change Everything
This is where it gets fun.
Bull-neck male: Thick trapezius muscles, shorter neck, powerful connection to the shoulders. Instantly reads as athletic and masculine.
Delicate female: Thinner neck, longer proportions, more curved trapezius muscles. Completely different feeling.
Same basic structure. Totally different vibe.
Keep It Loose
These are study drawings, not museum pieces. Keep your construction lines light. Indicate the ears with just two lines. You're learning the structure, not rendering a masterpiece.
The mask of the face? Just hint at it on the sides where it wraps around. You're not drawing the front view here.
Your Practice Assignment
Draw the back of the head at three different sizes:
- Large
- Medium
- Small
For each one:
- Start with your circle
- Divide it (½, then add another ⅓)
- Add the neck
- Indicate ears
- Draw the trapezius muscles
- Hint at the face mask on the sides
Then try two variations:
- Athletic/masculine (thick trapezius, shorter neck)
- Delicate/feminine (thin neck, curved trapezius)
Label them. It helps you remember what you learned.
Why This Matters
Understanding how the head connects to the neck and shoulders from the back view makes EVERY head drawing better. Even when you're drawing front views, you understand the full 3D structure.
Plus, it's a super common view in figure drawing, comics, storyboarding - basically anything where you're drawing people doing stuff instead of just posing for portraits.
Now grab your pencil and give it a shot. Circle first, always. 🎯
Continue Learning
- Previous: Back of the Head Construction
- Next: Head Angles; Ear, Cube and Tube Techniques
- Course Hub: Complete Head Drawing Course
More Drawing Resources
If you enjoyed this hand drawing course, explore even more lessons on our Free Drawing Tutorials & Courses Hub — including the complete How to Draw – Beginner’s Course.
Want new tutorials delivered to your inbox? Subscribe here and get free lessons, tips, and inspiration sent directly to you.