Figure Drawing Demo One: Back Pose Step-by-Step Process
Time to apply everything you've learned. Here's a complete back pose demonstration from start to finish, using vertical reference, longest sustained curve, pinch and stretch, and tube construction.

This lesson is part of the Figure Drawing Course - a complete free course teaching you to draw the human body from scratch.
Time to apply everything you've learned. Here's a complete back pose demonstration from start to finish.
Watch the full demo: hit play and learn more about how to apply the ideas we've learned so far to figure drawing.
Start with Vertical Reference
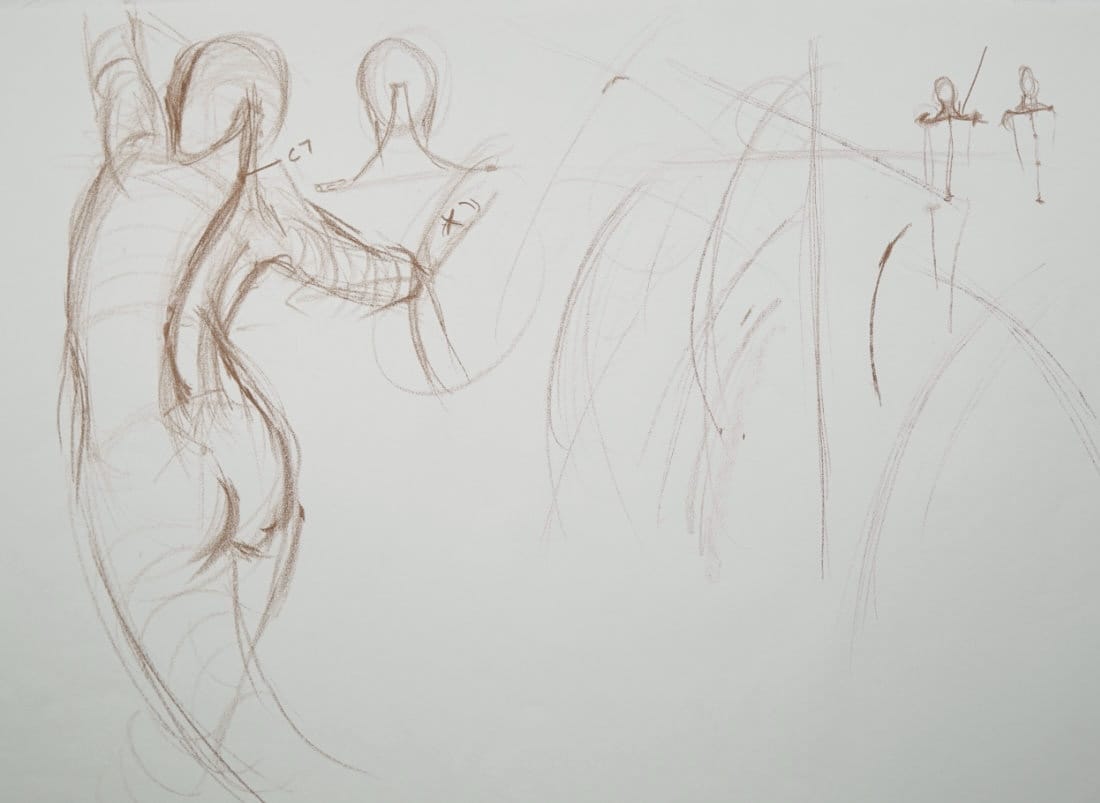
First move: light vertical line representing the top and middle of the back.
This is your GPS. Everything else gets measured against this straight line.
Hold your pencil vertically, compare it to the spine's curve. How does that angle relate to straight?
Don't try to nail it immediately. Just get close. Everything starts light.
Find the Longest Sustained Curve
Left side = stretch side = longest curve. That's your main gesture line.
Shoot past where you think the corner is. Extend the line, overshoot. You'll refine it later.
This curve is the foundation. Everything builds from here.
The Pinch Side is Different
Right side = pinch side = compressed, wrinkled.
Don't try to follow every wrinkle. Find the happy medium. Split the difference between the extreme pinch and the center line.
You'll add those details later. Right now, establish the tube.
Check Your Composition
Look at the page. Do you have room for the arms? The legs?
Adjust your placement NOW before you commit. Slide things up or down as needed.
Composition planning prevents disasters later.
Add the Center Line (Spine)
Go to the pinch point. Find those angles. The spine curves down the back - that's your center line.
Measure the space from spine to left edge (stretch side). Draw a parallel line on the right maintaining that tube structure.
Then add flesh on both sides of that spine line.
Place the Shoulders
Shoulders sit roughly where the spine tops out. This pose? Arms raised, so there's movement.
Don't need perfection yet. Just get close. You'll iron it out as you refine.
Tackle the Head
Head is slightly tucked. Trapezius muscles attach high on the skull, come down into the neck.
The neck sits in FRONT of the trapezius. Then the skull rounds up and back.
Quick sketch: mask of face, back of skull (very round), trapezius muscles extending toward clavicles, deltoids coming in.
Place the ear. Check that space between head and shoulder.
Address the Pinch (Again)
Arm raised? Everything pinches on that side - deltoids, trapezius, all compressed.
Look at those angles. Get your best guess in lightly.
Deltoid moving down toward body. That dent where the arm raises. Arm extending upward.
Break Down the Spine in Sections
The spine isn't one curve - it's three sections:
1. Cervical vertebrae (neck down to C7 protrusion)
2. Thoracic arch (upper back)
3. Lumbar (lower back)
Use your pencil to measure how each section angles differently. The spine curves, shifts direction through these sections.
Add the Legs
Find where the spine ends. That sacrum triangle area gives you the starting point for leg construction.
Longest sustained curve for the leg moving down. Inside of that leg. Check direction - is it coming toward you or away?
This leg? Moves toward you. Wraps around, then away as it descends.
Tube established. Direction captured.
What We Accomplished
We used:
- Vertical reference
- Longest sustained curve
- Pinch and stretch
- Shooting past corners
- Light layering
- Center line (spine)
- Breaking complex curves into sections
- Tube construction
First demo complete. The concepts work. You've seen them applied start to finish.
Course Navigation
Part of: Figure Drawing Course > Module 1: Foundation
← Previous Lesson: Drawing Tips
Next Lesson → Demo Two
Continue Learning
If you enjoyed this hand drawing course, explore even more lessons on our Free Drawing Tutorials & Courses Hub — including the complete How to Draw – Beginner’s Course.
Want new tutorials delivered to your inbox? Subscribe here and get free lessons, tips, and inspiration sent directly to you.


