Facing, Leaning, Tilting & Rotating: The Pinch and Stretch Method
Most poses you see in real life are stiff and boring. Figure drawing isn't. Here's how to handle dynamic poses where the body twists, leans, and rotates in space using the pinch and stretch method.

Most poses you see in real life are stiff and boring. Figure drawing isn't.
Here's how to handle dynamic poses where the body twists, leans, and rotates in space.
This lesson is part of the Figure Drawing Course - a complete free course teaching you to draw the human body from scratch.
Watch the full lesson: hit play to discover tips for drawing people in various positions.
The Reality: Life is Boring, Poses Aren't
You stand square to the mirror brushing your teeth. You stand upright at the water cooler. Anatomy books show stiff, frontal figures.
But figure drawing? The lower body is in profile while the upper body rotates toward you. The torso bends forward. One side stretches, the other compresses.
Dynamic poses are the norm, not the exception.
Center Lines Are Everything
You need landmarks to understand rotation.
Front center line:
- Suprasternal notch (top of ribcage)
- Xiphoid process (bottom of sternum)
- Navel
- Pubic bone
Back center line:
- C7 vertebrae (base of neck)
- Spine running down
- Thoracic arch, lumbar, into pelvis
These center lines show you how the body twists. Compare space on either side of center - that tells you rotation.
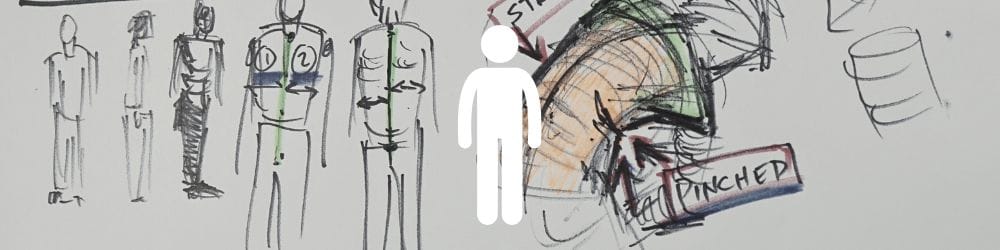
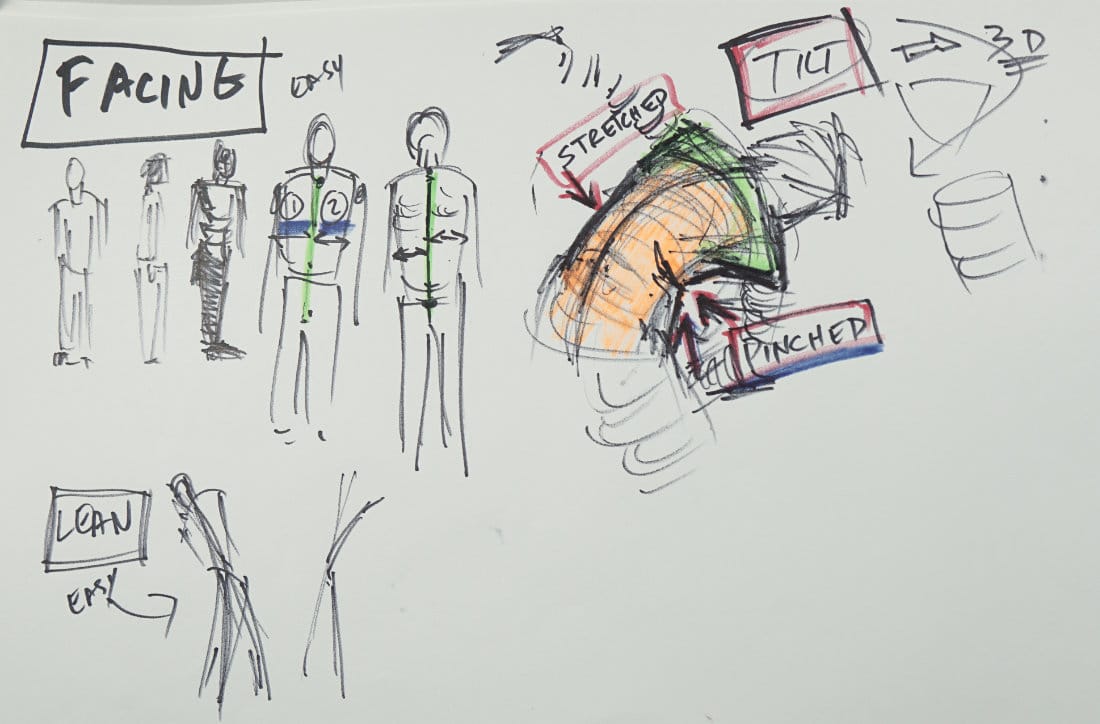
The Pinch and Stretch Method
When the body rotates, one side compresses (pinch), the other extends (stretch).
Here's the technique:
1. Find the center line (front or back, depending on view)
2. Go to the narrow side first (the side with less visible space)
3. Measure from center to edge at the waist level
4. Draw that measurement straight up (don't curve out to shoulders yet)
5. Go to the wide side and do the same
6. Find the pinch - where does the waist compress on the narrow side?
7. Separate the shoulder girdle (inverted V shape on top) from the torso tube
Now you have the torso tube AND the shoulder structure sitting on top. The rotation is locked in.
Why This Works
You're NOT starting with the shoulders and working down. That's how you lose the twist.
You're establishing the torso tube FIRST with its rotation already built in, THEN adding the shoulder girdle on top.
The pinch tells you where the top of the tube is. The stretch shows you the other side. The tube handles the rotation.
Example: Back View, Bent Forward
Figure bending forward, back to you, slight rotation.
- Draw center line (spine) with its curve
- Measure narrow side at waist - how much space from spine to edge?
- Draw that straight up
- Measure wide side - more space from spine to edge
- Draw that straight up
- Find the pinch on narrow side - where does it compress?
- That's your top landmark
- Add inverted V for shoulder girdle
- Done - rotation captured
The Hard Part: Tilt
Facing = 2D (easy)
Leaning = 2D (easy)
Tilting = 3D (hard)
Tilt is when things move TOWARD you or AWAY from you in space. That's the challenge. That's what makes figure drawing difficult.
But the pinch and stretch method handles it. The tube bends, one side compresses, the other extends. You measure both sides against the center line.
Foreshortening? Built in.
Course Navigation
Part of: Figure Drawing Course > Module 1: Foundation
← Previous Lesson: Pencil Methods
Next Lesson → Connecting Line
Continue Learning
If you enjoyed this hand drawing course, explore even more lessons on our Free Drawing Tutorials & Courses Hub — including the complete How to Draw – Beginner’s Course.
Want new tutorials delivered to your inbox? Subscribe here and get free lessons, tips, and inspiration sent directly to you.


