Norman Rockwell Ear Drawing Analysis
Study how master artists simplify the ear using clear forms, subtle angles, and tubular design. Learn how to stylize without losing structure.


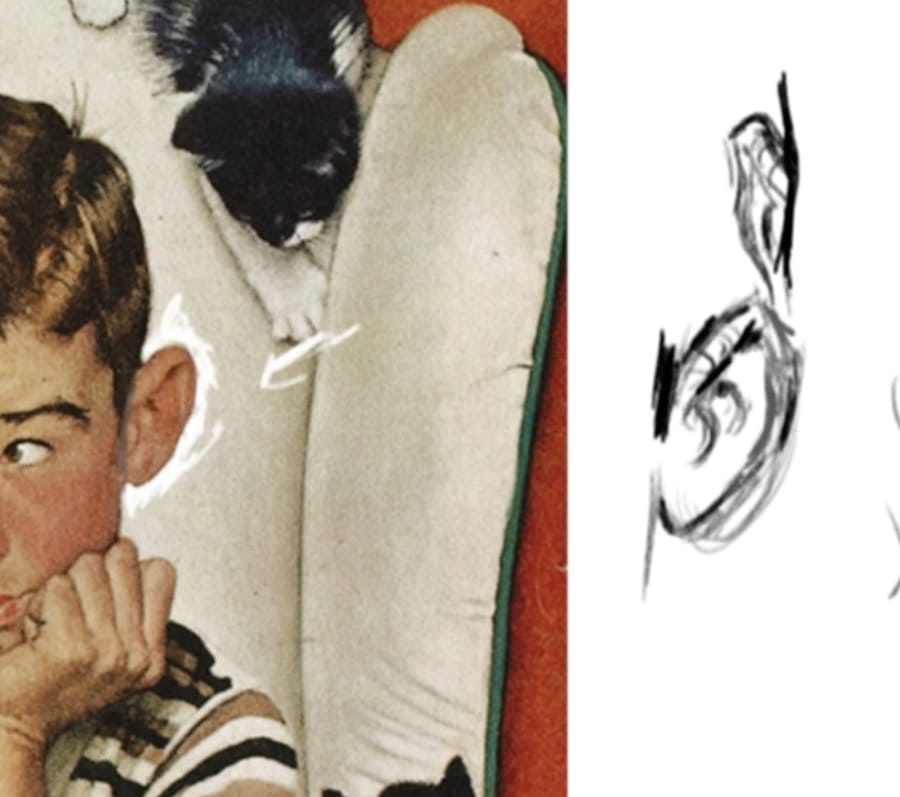
One of the best ways to grow as an artist is by studying the masters. In this lesson, I’m breaking down a few Norman Rockwell examples to see how he handled the ear’s shape, rhythm, and structure.
This lesson is part of How to Draw the Head Course.
Simplifying the Forms
Rockwell’s ears show how effective simplicity can be. He used soft tubular shapes with subtle value changes to describe structure — no harsh outlines or over-modeling.
You can see the same ideas we’ve practiced:
- The C-shape defining the outer rim
- The tubular flow that loops up and around the top
- The inner folds that taper and merge into shadow
Even in a realistic painting, Rockwell didn’t chase detail — he focused on gesture and direction.

Understanding Angles and Planes
In the first study, notice how the ear’s main axis tilts slightly against the face plane.
This creates contrast and rhythm between the jaw, cheek, and ear connection.
When viewed from the side, that tilt becomes even clearer — the face leans forward while the ear cuts slightly back. This opposition gives the head structure and helps keep it from feeling flat.
Try sketching these two angles together: a diagonal for the mask of the face and another for the ear tilt. You’ll instantly see how they complement each other.
Light, Shadow, and Design
Rockwell often used soft shadows within the ear to show its depth — a few well-placed dark accents inside the bowl and along the rim do all the work.
Keep the rest quiet. A strong highlight on the upper rim or lobe adds life, but if you overstate every fold, the ear loses character. Focus on the big shapes, not the noise.
Stylizing the Ear
As you study the masters, try reinterpreting their structure through your own line quality. Push edges, simplify shapes, and vary your contours.
Think of it this way: once you understand the real structure, you earn the freedom to bend and exaggerate it. That’s where your personal style starts to show up.
Practice Tip
Do a few quick studies from Rockwell or other portrait masters. Focus on:
- The direction of the ear tilt vs. the face plane.
- The tubular flow from top to lobe.
- Simplifying shadows into 2–3 clear value groups.
Keep them loose — think like you’re designing form, not tracing anatomy.
Course Navigation
Previous Lesson: Ear Drawing Part 3 – Back View, Thickness, and Volume
Next Lesson: Master's Ear Drawing Analysis Part 2
Head Drawing Hub: Complete Head Drawing Course
Continue Learning
If you enjoyed this hand drawing course, explore even more lessons on our Free Drawing Tutorials & Courses Hub — including the complete How to Draw – Beginner’s Course.
Want new tutorials delivered to your inbox? Subscribe here and get free lessons, tips, and inspiration sent directly to you.


