Ear Drawing Assignment – Robert’s Take and Demonstration
Robert demonstrates his ear drawing process using quick three-minute sketches. Learn how to focus on structure, rhythm, and connection.

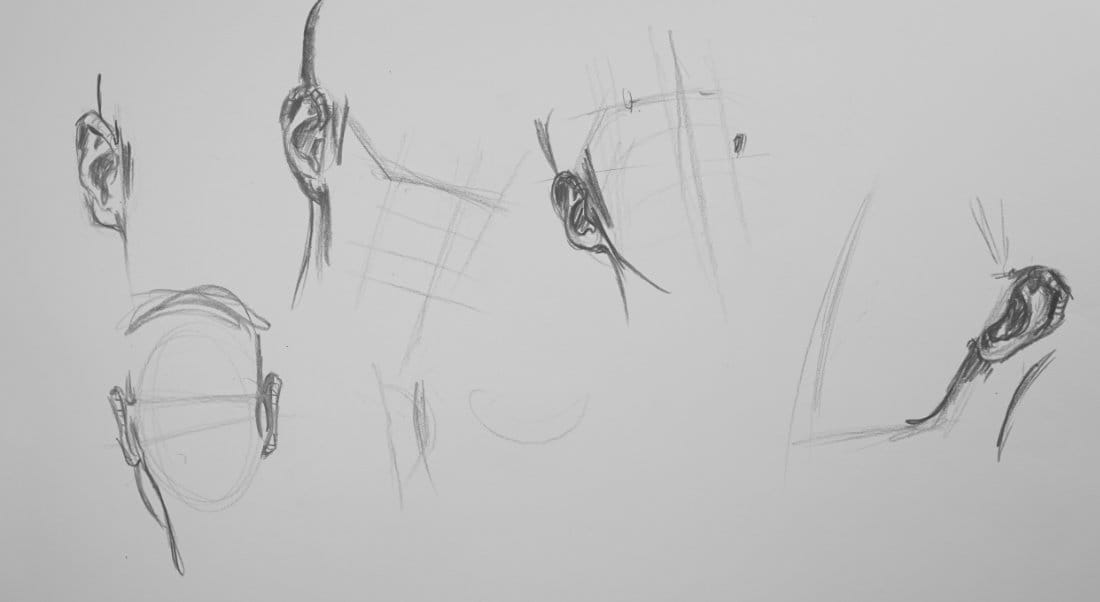
In this follow-up to the ear assignment, I’ll show you my take on the three-minute poses and how I approach each study. The goal isn’t perfection—it’s rhythm, structure, and flow.
This lesson is part of How to Draw the Head Course.
Simplify and Move with Purpose
I start with one ear per pose. It’s better to focus on one clear idea—a single construction, angle, or structure—than to get caught up in drawing both sides.
Each ear has its own personality, so stay curious. Look for what makes each one different and express that individuality in your marks.
I use a Prismacolor red pencil to build the foundation—a simple C-shape and upper tube. From there, I refine and adjust based on the specific ear I’m studying. Some ears flare out dramatically; others tuck close to the skull. Each version teaches you something new.
Understanding Depth and the “Bowl” Form
Pay attention to the inner channel. You can see that deep dish form, or what I call the “bowl,” in nearly every view.
When sketching quickly, use soft shading to separate the inner bowl from the outer rim. Let your line weight carry the sense of depth—thicker lines in shadow, thinner in light.
In some poses, the jaw overlaps the ear, reminding us that the ear belongs behind the facial plane. This overlap makes the head feel more three-dimensional.
Layering and Connection
One of the biggest lessons here is how the ear connects to surrounding forms. Notice the subtle layering:
- The jaw cuts in front of the ear.
- The sideburn or cheek overlaps slightly.
- The skull rolls back behind it.
That relationship creates a sense of staging and solidity. When in doubt, check those transitions—the ear should feel attached, not floating.
Practice Tip
Do a page of quick ear sketches from multiple angles. Don’t erase—just keep layering lines as you work through each form. These overlapping shapes and lines help build visual understanding and confidence with proportion.
Course Navigation
Previous Lesson: Ear Drawing Assignment and Practice Reel
Head Drawing Hub: Complete Head Drawing Course
CONGRATS! You finished the Head Drawing Course!!!
Continue Learning
If you enjoyed this hand drawing course, explore even more lessons on our Free Drawing Tutorials & Courses Hub — including the complete How to Draw – Beginner’s Course.
Want new tutorials delivered to your inbox? Subscribe here and get free lessons, tips, and inspiration sent directly to you.