Colorful Watercolor Eggs Project
Practice all your watercolor techniques with this fun colorful eggs project. Perfect beginner exercise for exploring color, brush control, and timing without pressure.

Welcome to the best watercolor project on the planet- colorful eggs! Ok, maybe a little over the top there, but trust me, it's a good one! This is going to be a lot of fun. You're going to explore color and all these watercolor techniques we've been learning in one relaxed exercise.
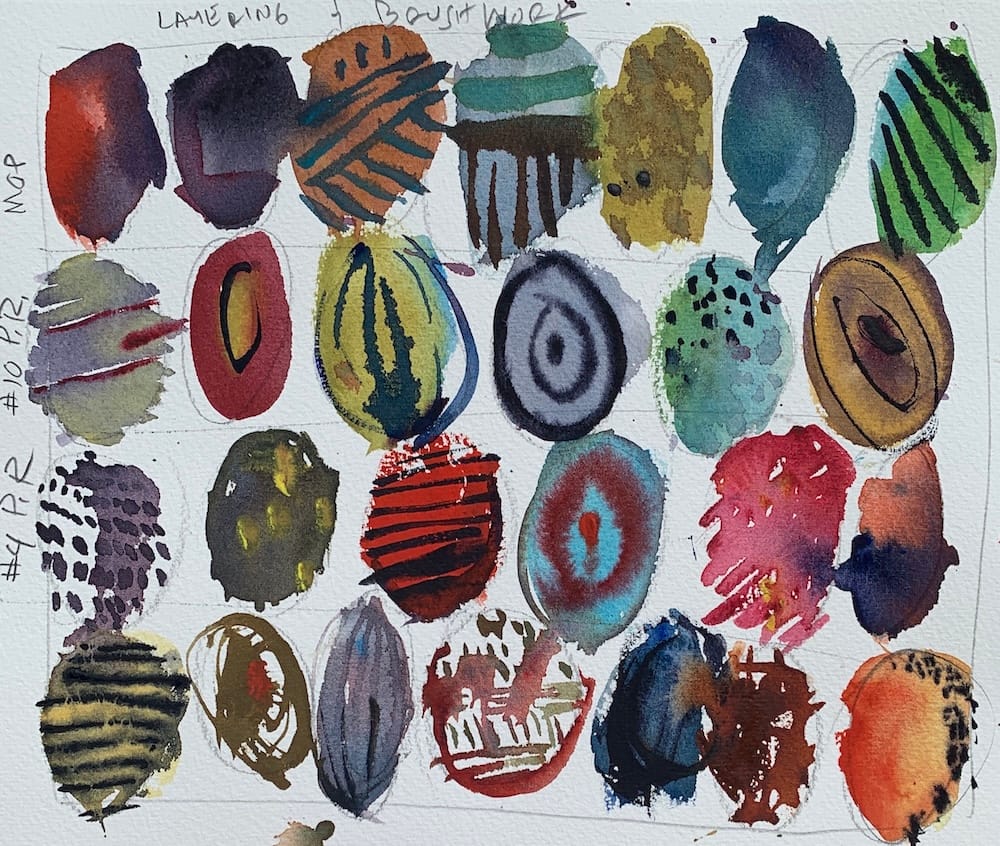
I'm going to create a series of four lines and fill those up with eggs. My eggs are imperfect because I want different sizes to explore with. This project is great for experimenting without pressure.
π Want step-by-step lessons? Visit the Watercolor Hub for tutorials and free courses.
Why Eggs Make Perfect Practice
Here's the thing - eggs are simple shapes that let you focus on watercolor technique instead of worrying about drawing. You can make them any size, any color, and if one goes wrong, just move on to the next one.
This is where you get to play with all those brush strokes we talked about - using different parts of the brush to create variety. That's exactly what we want to do here.

Row One: Mop Brush Exploration
The first row I'll dedicate to my mop brush. I'll apply some tea mixtures - very thin, very random.
Remember everything about water management - how wet is the paper? How wet is the brush? As I add layers, timing becomes important. I want to avoid ballooning and have control while exploring these different conditions.
Here's a complete guide to watercolor layering.
Here I'm using neutral tint, some random colors, and as I get into it, I'm thinking about different wash varieties - gradations, flat washes, variegated washes. Just mix and mingle all these techniques.
Working into wet paint, adding slightly thicker paint, going back into that red egg with richer pigment. Remember, if timing is wrong, you'll start getting cauliflower blooms.
I want to end up with interesting-looking eggs, but I don't want poor technique - no bunch of cauliflowers happening.
Study the image above: Complete colorful watercolor eggs project demonstration showing different brush techniques, wash varieties, and experimental approaches perfect for practicing watercolor fundamentals without drawing pressure.
Working Wet-into-Wet Safely
I can work wet-into-wet using random pigments, mixing into the wet paint. If I do it at this stage, it's pretty safe because all these washes are still very wet.
Now I'll switch to a smaller brush and try some lifting. The brush is damp - I'm just experimenting with that technique.
Row Two: Number 10 Pointed Round
I'll let that dry a bit and move to my second row, dedicated to the number 10 pointed round. Notice how I use a series of lines, working back and forth to create egg shapes.
Here I painted a big O. As I get further into this exercise, I'm doing things more randomly and spontaneously, all while trying to use good technique and timing.
Mixing colors, dropping different pigments into it - this is a great exercise for exploring color combinations. Painting and learning can be so rigid sometimes. It's good to have really expressive projects that loosen you up and bring spontaneous energy back into the creative process.
These washes are still wet enough that I can work into them with tea mixtures, milk mixtures, or even thicker paint.
Row Three: Number 4 Pointed Round Fun
With my number four pointed round, I'll do another row. Now I'm experimenting with dots - instead of painting a flat or gradated wash, I'm making egg shapes using dots.
I can use a series of lines too. Just having fun, getting familiar with brush work, letting colors mix a little. This is a great way to discover a lot about painting without putting pressure on yourself.
There's one with dry brush technique - I used a damp brush with very little water in that red, created a dry brush egg. Backing that up with a thin layer of blue, trying to come up with more fun ways to paint eggs.
Using diagonal strokes, getting used to that small pointed round for lines. It's wonderful for adding linear interest to your art.
Row Four: The Wild Card Sword Brush
Now I get to my wild card, one of my favorite brushes - the sword. This one's harder to control. It's flimsy, doesn't have that snapback a good pointed round has, but that's what I like about it.
There are times when you don't want to control every stroke - you're looking for something more abstract and random.
Exploring curly lines, little curlicues, dropping thick paint into it. Having a good time getting to know the brush while exploring and refining techniques and timing.
Not every egg has to be colorful and beautiful. Some can be gray, dark, sketchy. Experimenting with short lines, long lines, whatever I can come up with.
The Learning Process
The main thing I want you to explore is good technique and getting familiar with putting paint down, getting timing right - all the things we've talked about.
There's been a lot of information thrown at you, so exercises like this help. Put really dry paint down - that thick honey mixture - then drop water or really thin mixtures into it, see how it mingles.
That's a huge part of being a beginner - getting familiar with the medium itself.
Working Into Drying Paint
Now that the eggs are mostly dry, I want to work into them a little. Obviously timing is risky here. If you do it wrong, you'll end up with cauliflowers. If your mixtures are too thin and weak, again - cauliflower.
Depending on how wet the egg is determines how thick your paint needs to be. Pay attention to the conditions and apply accordingly.
When working into wet paint like this, the thicker you go, the safer you are. But you don't want to just slap thick paint down. You want to find that sweet spot - maybe between tea and milk consistency.
You're starting to discover those boundaries - areas where timing or paint choice could be bad, or "Hey, I got away with something I didn't realize I could do."
That's what this exercise is about. And the whole time you're creating pretty fun artwork.
Here is a complete guide to painting wet-in-dry with watercolor.
Understanding Watercolor Behavior
These are the conditions you'll be painting in - working wet-into-wet, getting timing and mixtures right. That's the key to understanding watercolor.
Notice how I used just water in that egg with all the dots, just to blend it up. Those dots stayed because they've stained the paper. Watercolor has pigment - those pigments are like dye. If they sit on paper long enough, they permanently mark it.
Even though I dissolved some with water, marks stayed because they'd stained the paper and were dry enough not to be impacted like they would be if I'd wet them right when I painted them.
Your Turn to Experiment
Create a similar project and have fun. If you start seeing lots of cauliflowers and weird things happening in your eggs, you know you need to go back and think about timing and mixtures.
This exercise teaches you more about watercolor behavior than a dozen technique demonstrations. You're discovering what works, what doesn't, and building that intuitive understanding that makes watercolor click.
The goal isn't perfect eggs - it's understanding your materials and building confidence through exploration.
Ready to apply your systematic watercolor knowledge? This project uses techniques from our complete watercolor wash series and brush control methods in a fun, low-pressure format perfect for building confidence.
Continue Learning
π Next stop: check out my Free Watercolor Painting Course or browse the Watercolor Tutorials Hub to keep building your skills.
π Follow me on Pinterest for daily watercolor inspiration!
If you enjoy these kinds of raw insights and loose watercolor demos, youβll feel right at home here. Subscribe to Crafted by Robert and follow along as I share painting inspiration, tips, and behind-the-scenes stories straight from my garage studio. π Subscribe to Crafted by Robert
π Painterly Hub: your destination for painting loose, expressive art.
My Toolbox
Here are the materials I use all the time and have for decades. I only buy from Blick Art but feel free to shop where you prefer.
Recommended Watercolor Materials
-
Holbein Professional Watercolor Paints β 8 Essential Hues
Yellow Ochre, Cadmium Lemon Yellow, Ultramarine Blue, Cerulean Blue, Alizarin Crimson, Cadmium Red Light, Neutral Tint, Burnt Sienna -
Fabriano Artistico Watercolor Paper β 140lb Cold Press
Buy full sheets and cut into quarter sheets for best value -
Silver Jumbo Wash Brush
Great coverage, excellent quality for the price -
Princeton Neptune Point Rounds (No. 12 & 6)
Reliable and affordable detail & wash brushes -
Princeton Neptune Dagger (1/2")
Versatile size for lines, edges, and detail work -
Masterson Aqua Pro Palette
Durable, with deep wells for generous mixing space -
Gator Board
Lightweight, long-lasting painting support board -
Holbein White Gouache
Optional for highlights and fine details - Miscellaneous: plastic water containers, paper towels, masking tape