Box Construction Part 7: Neck Connection and Series Wrap-Up
Series finale: Learn to connect the head to the body with neck muscles, understand overlapping structures, and recap the complete box construction system. Includes full series summary and practice assignment.

Final part of the box construction series. Let's connect the head to the body properly and recap everything you've learned.
Did you know? This lesson is part of a complete step-by-step head drawing course. If you haven't watched from the beginning I highly recommend you do so to get the most out of this lesson.
Watch video: hit play and see how the neck works with head drawing using box construction.
The Sternocleidomastoid: Your Neck Cable
When you're drawing these complex positions, you need to understand the sternocleidomastoid muscle.
Big word. Simple concept.
It's a muscle cable that runs from behind/in front of the ear down into the neck. It moves the head side to side.
You'll see it here, moving down. Just a cable. A muscle cable that makes the head rotate.
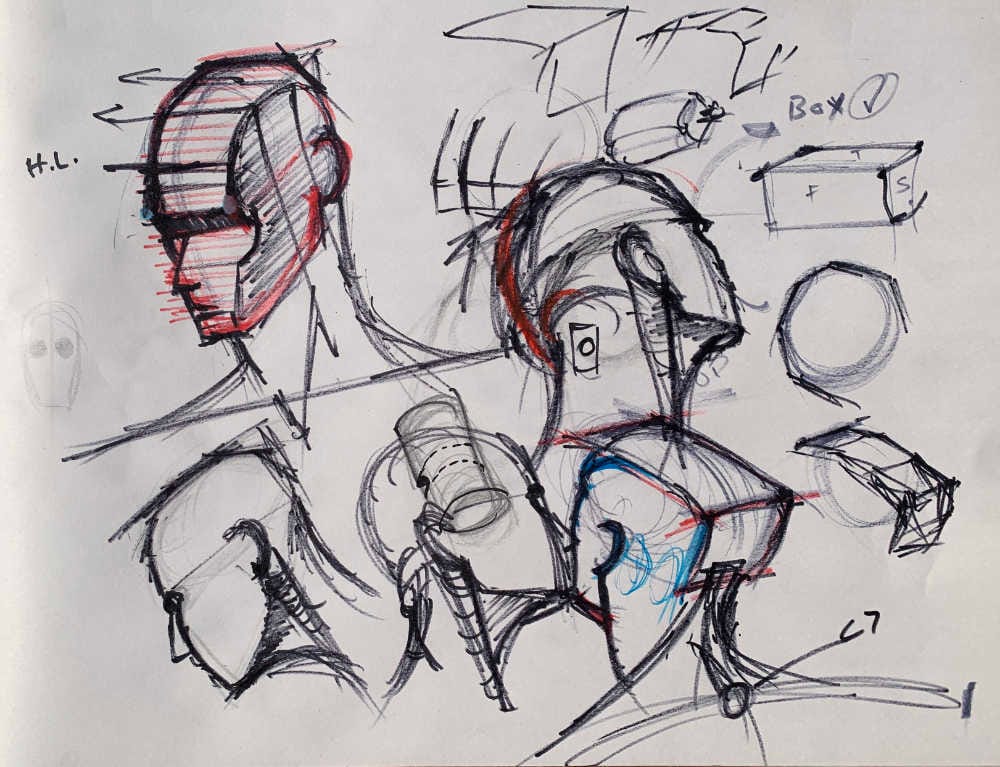
Overlapping: Head, Neck, and Throat
The back of the head eventually comes around. The neck moves out this way.
Critical overlapping happening: The neck moves here. The throat. The sternocleidomastoid.
Let me draw that clearer:
Jaw coming around to the chin. Throat there. Ear. Cables running down.
That's what you're seeing.
The face is moving off this way, creating overlapping. It overlaps the throat and the digastric plane.
How It All Connects
The throat and neck move off this way. The head moves up and around.
From this angle, you'd see:
- A little bit of throat right there
- Sternocleidomastoid moving down this way
- That overlapping
- The back of the neck
- The spine moving back down
Adding the Trapezius
The traps come in, moving off this way. Your shoulders.
The traps overlap each other.
Right in there? That's your C7 - the seventh cervical vertebrae. For those who took my figure class, you know this landmark well.
It's the bump at the base of your neck when you tilt your head forward.
Breaking Down More Angles
This starts to break down a few more angles for you.
Hopefully it makes more sense now - understanding the box idea and remembering the other things we talked about throughout this series.
The Core Takeaways
You can take something very round and make a box out of it.
Sometimes just a little hitch here and there in a circle - showing a subtle change in direction - is all you need.
You may want to put the head in a full box. Or use those subtle changes.
Whatever works for you to understand the top and sides.
What We Covered in This Series
Part 1: Structure = form + position. More corners = more information.
Part 2: Facial planes and landmarks. Front vs side transitions. The 5-eyes rule.
Part 3: Nose protrusion and foreshortening. How the nose moves in its own direction.
Part 4: Jawline construction. Avoiding the mask look. Bilateral symmetry.
Part 5: Boxing the round skull. The hitch technique. Top vs side planes.
Part 6: Complex angles and the barrel notch technique. Eye sockets curve around the form.
Part 7: Connecting to the neck. Overlapping structures. Wrapping it all together.
The Notch in a Barrel Recap
We talked about using this notch idea - like drilling into a barrel - to understand the eye socket from a side view, from a three-quarter view, when the head's turned away.
That technique alone will change how you see eye sockets forever.
Why Box Construction Matters
It gives you clarity on construction ideas and why they're important.
You're not just drawing what you see. You're understanding:
- Where planes transition
- How forms overlap
- What's in front, what's behind
- How perspective affects everything
That understanding is what separates construction from copying.
Moving Forward
We're going to pause with the schematic drawings for now.
Next up: We're diving into old masters' work to see how these box construction ideas played into their art.
You'll see that the masters - whether they consciously thought about it or not - were using these same structural principles.
Your Assignment Before Moving On
Before jumping into the masters analysis, do this:
Draw 3 heads with full neck attachments:
- Three-quarter view from below (show sternocleidomastoid, throat overlapping)
- Side view turning away (show neck cables, trapezius, C7)
- Any complex angle (incorporate everything from this series)
For each one:
- Box out the skull
- Show the hitch transitions
- Add the sternocleidomastoid muscles
- Show overlapping structures
- Mark the trapezius and C7 if visible
- Use the notch technique for eye sockets
These drawings should look structural, not pretty. You're cementing the construction knowledge, not making portfolio pieces.
The Big Picture
Box construction isn't the only way to draw heads. It's not even the "right" way.
But it's a way that forces you to see structure.
And once you see structure, you can draw from any angle, in any position, with confidence.
Some artists use box construction forever. Some use it to learn, then soften their approach. Some combine it with other methods.
The point is having the OPTION.
When you hit a difficult angle and don't know what to do, you can fall back on box construction. It never fails.
Series Complete
You've made it through all 7 parts. That's real work. Most people quit after Part 2 or 3. You pushed through to the end.
Now you have a complete structural system for drawing heads from any angle.
Course Navigation
- Previous: Box Construction Part 6
- Next: Master's Analysis - How They Used Box Construction
- Course Hub: Complete Head Drawing Course
Continue Learning
If you enjoyed this hand drawing course, explore even more lessons on our Free Drawing Tutorials & Courses Hub — including the complete How to Draw – Beginner’s Course.
Want new tutorials delivered to your inbox? Subscribe here and get free lessons, tips, and inspiration sent directly to you.


