Box Construction Part 5: Boxing the Skull
Convert the round skull into box construction using the hitch technique. Learn to identify top vs side plane transitions, use the temporalis line, and break out of smooth circles for dimensional heads.

Time to tackle the trickiest part of box construction: converting something round (the skull) into something with corners. Sounds contradictory, right? Stay with me.
Did you know? This lesson is part of a complete step-by-step head drawing course. If you haven't watched from the beginning I highly recommend you do so to get the most out of this lesson.
Watch video: time to level up your drawing skills!
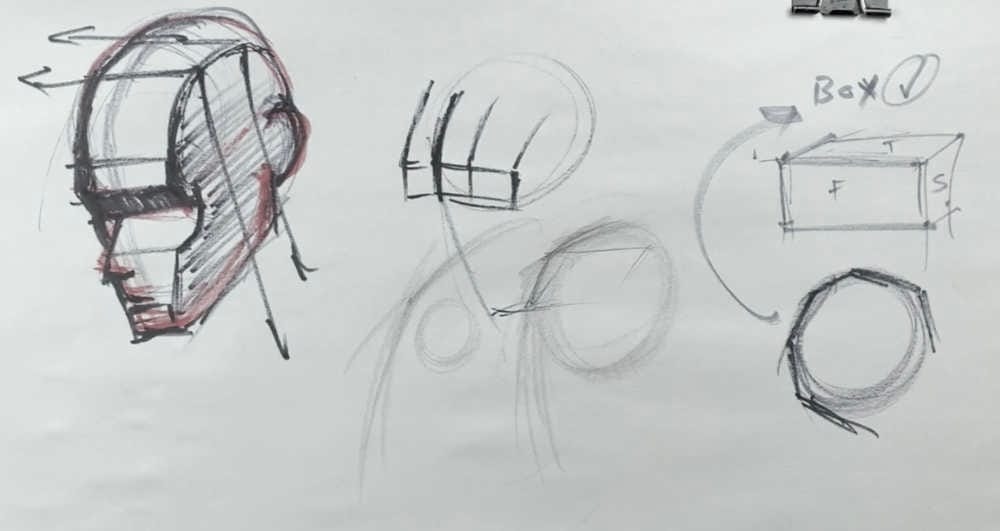
Quick Recap: The Face Mask Box
Previous lesson, we turned the mask of the face into a box. Front plane, top plane, sides. Using corners to determine where things transition.
With facial features, this is easier because the face already has natural corners - eyebrow peaks, cheekbones, jawline angles.
But here's the challenge: The top of the skull is ROUND. How do you put corners on something that's naturally curved?
That's what we're solving today.
The Problem: Round Objects Need Box Ideas Too
The skull is a sphere. Or close to it.
But we need to understand where the front is, where it transitions to the side, where it goes underneath.
Solution: Convert that round object into box construction thinking. Give it planes even though it's curved.
Starting with a Looking-Down View
Let's draw a head looking down. Figure tilting forward.
Start with the top of the skull. Add the ear on the back. Center line. Wrap it around the skull.
Now the face: jaw line, top of the eyebrows, the forehead underneath, nose coming out, mouth.
Applying the Box to the Forehead
We know the corners of the eyebrows go up - that's the line moving back.
Eye sockets move down. Cheeks are the widest point. Use a contour line to get that.
Then the line moves down, tapers as it meets the chin.
This tells us: Where the front of the face is. How it transitions to the side.
Front plane. Then underneath the eyes (bottom of forehead, under eye sockets), there's a slight inward angle.
The Temporalis Line: Your Secret Weapon
The temporalis muscle sits near the eye socket. On a skull, it moves up along this line, then sort of fades and blends into the roundness of the skull.
That line is gold. It's a natural indicator of where the side begins.
If you follow that line around, you start to see: top here, side there. Top here, side there.
Already you have a little hitch in that curve. A slight angle change.
The "Hitch" Technique
Here's the key move: put a slight hitch in the curve.
Instead of a perfectly smooth round skull, introduce a subtle angle change where the top transitions to the side.
Example:
- Forehead comes down
- Then there's a HITCH - a slight change in direction
- Then the top of the head
That hitch breaks you out of drawing a perfect circle. It gives you a plane transition.
Interpreting Round Shapes with Planes
Draw the head looking down. The forehead. Then this change - a line coming down. A slight hitch. To the top of the head.
You're starting to see: How interpreting a round shape with planes helps you understand tops and sides.
Combine that with a little ghosting - putting that line back up and around - and you've got structure.
Yes, It Looks Robotic at First
I know. Right now it looks mechanical. Stiff. Blocky.
That's fine. This is construction phase.
It's going to get more organic. But first, you need to understand HOW things are constructed.
We're applying this idea to plot out features and understand where front, sides, tops, and bottoms are.
Once you have that structure, you can soften it. Round it out. Make it feel natural.
But you can't skip the structure and hope it works out.
Breaking the Circle with Arcing Lines
Instead of drawing one smooth circle for the skull, use a series of arcing lines.
Each arc has a slight angle change. That little hitch.
Before: Smooth circle (no information)
After: Series of arcs with hitches (plane information)
That's all you need to break out of the circle trap.
Starting Your Drawing with This Method
You can approach it multiple ways:
Option 1: Start with your circle, then go, "Okay, it's coming down. I can see where the forehead starts." Add that overlapping. Refine things.
Option 2: Start with the planes first. Top plane, side plane, front plane. Then connect them with curves.
Option 3: Rough in the round shape, then find the hitch points and mark them.
All three work. Pick what clicks for you.
Why This Matters for the Whole Head
The skull isn't the only round part of the head. The cheeks curve. The forehead curves. The jaw curves.
If you can't put planes on round forms, you'll struggle with the entire head.
This technique - finding the hitch, marking plane transitions on curves - applies everywhere.
The Top vs Side Problem
Most beginners draw the skull as one smooth dome. No differentiation between top and side.
Result: Flat, circular heads that look like balloons.
Fix: Identify where the top becomes the side. Use that temporalis line. Add the hitch.
Result: Dimensional heads that feel solid.
Practice Assignment
Draw 5 skulls from different angles.
For each one:
- Draw it as a smooth circle first
- Find the temporalis line (or equivalent transition point)
- Add a hitch where top becomes side
- Mark the planes: top, front, side
- Compare the structural version to the circle version
You'll see immediately how much more information the planes give you.
Course Navigation
- Previous: Box Construction Part 4
- Next: Head Box Construction Part 6
- Course Hub: Complete Head Drawing Course
Continue Learning
If you enjoyed this hand drawing course, explore even more lessons on our Free Drawing Tutorials & Courses Hub — including the complete How to Draw – Beginner’s Course.
Want new tutorials delivered to your inbox? Subscribe here and get free lessons, tips, and inspiration sent directly to you.


