How to Draw Lips – Shading and Structure
Discover how to draw lips with realism. Learn the five pillow forms, natural shading, and line flow that make mouth drawings come alive.


In this follow-up lesson, we’ll explore how to draw lips with depth and realism. You’ll learn how to shade around the five pillow forms of the mouth, handle the subtle transitions, and understand how age and form affect the structure.
This lesson is part of How to Draw the Head Course.
Understanding Lip Structure and Age Differences
Younger lips have soft, full shapes — think of babies with those round, pillowy forms. As we age, the lips tend to flatten and lose some curvature. Keeping that in mind helps you design lips that fit the age, personality, and vitality of the portrait.
The lips are made of five pillow-like forms: three on top and two on the bottom. This gives them that rolling, natural look instead of a flat shape.
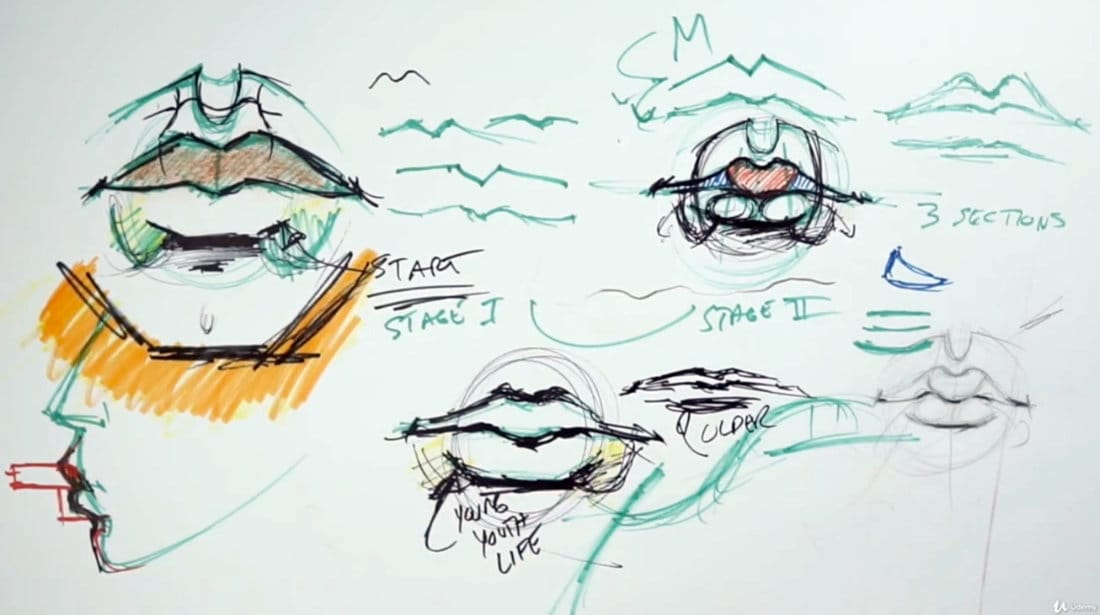
Building the Lips Step by Step
Start with a center line — this defines where the lips meet. Then add the small “V” shape at the top (the Cupid’s bow).
The upper lip curves slightly down before meeting the corners, while the bottom lip rolls out and back in toward the chin.
Keep your construction lines light so you can adjust as you go. Once the basic shape feels right, use line variation — darker in the creases, lighter at the edges — to give life and softness to the form.
Shading for Realistic Volume
Add darker tones where the upper and lower lips meet, especially near the corners.
Under the bottom lip, use a soft gradient to suggest form turning into shadow. The transition between light and dark should always be subtle — avoid harsh edges or over-blending.
Think of the mouth as a barrel — the lips stretch around it. As they curve toward the sides, the light fades naturally. Small value shifts make a huge difference here.
Line Flow and Organic Edges
The goal is movement — not static lines. Let the lips breathe by tapering your strokes.
Darken the crease lines slightly and let them fade as they wrap around the form. Add small accents where the cheek overlaps near the mouth corners for depth and realism.
Course Navigation
Previous: Upper & Lower Lips Part 1
Next: Master’s Mouth Analysis Part 1
Head Drawing Hub: View Full Course Hub
Continue Learning
If you enjoyed this hand drawing course, explore even more lessons on our Free Drawing Tutorials & Courses Hub — including the complete How to Draw – Beginner’s Course.
Want new tutorials delivered to your inbox? Subscribe here and get free lessons, tips, and inspiration sent directly to you.


