Semi-Blind Contour Drawing | Elevate Your Drawing Skills
Think of your art time like a pie chart: some slices for finished art, some for exploration, and some for fundamentals. This semi-blind contour drawing exercise builds confidence and sharpens observation so you can elevate your drawing skills.

Think of your drawing practice like a pie chart. If you want to improve your drawing skills, you need to divide your creative time between beginner drawing exercises, exploration, and finished artwork. One of the most effective exercises is contour drawing — a method that trains observation and hand–eye coordination.
For years, I neglected this slice of the pie. I could draw “okay,” but I never gave serious time to perspective or foundational drills. And I see the same with students: they pour everything into finished art, but skip the simple exercises that actually make their drawings stronger.
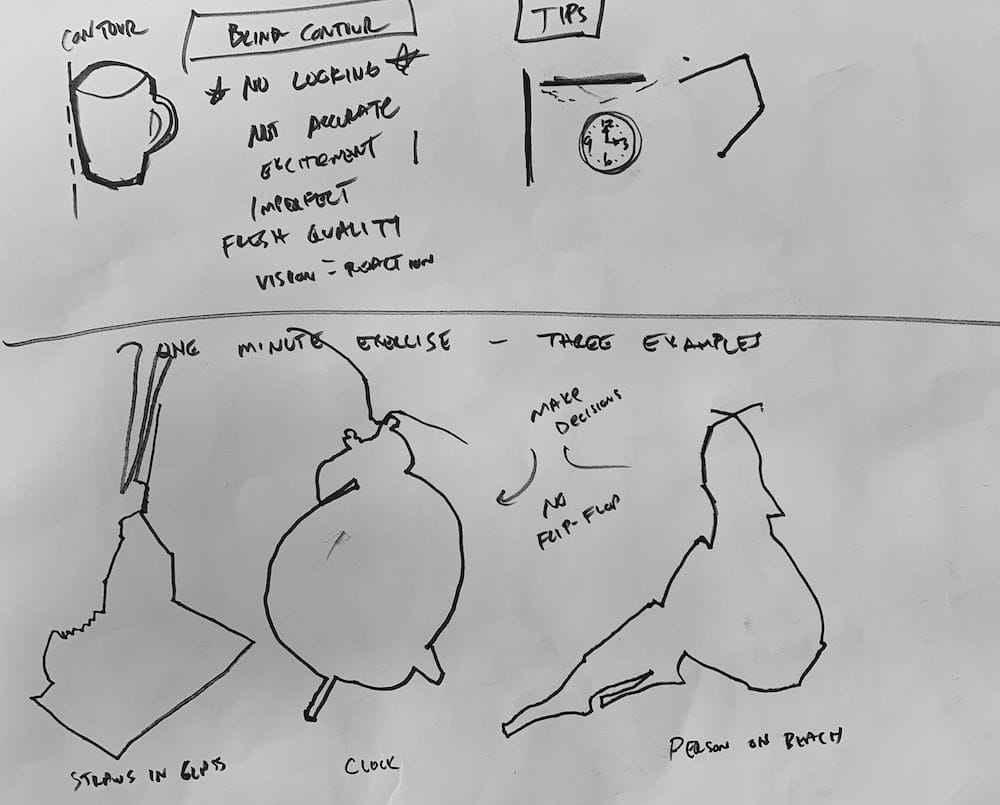
That’s where the semi-blind contour drawing exercise comes in. It isn’t about making a masterpiece; it’s about sharpening your fundamentals. This drill builds line confidence, strengthens observation, and reminds you that practice is just as important as polished work.
Want more lessons? Visit the Free Drawing Tutorials & Courses hub →
Hands shaky? Lines messy? This semi-blind contour exercise is one of the best ways to train your eyes and hand to work together. It’s similar to a blind contour drawing — but you get to peek occasionally, which gives you more accuracy without losing the spontaneity.
In this beginner-friendly drawing exercise, you’ll learn how to:
- Strengthen observation skills
- Improve line confidence
- Avoid messy “sketchy” lines
- Capture honest, expressive drawings
Step 1 – Understand the Difference
- Blind contour = draw without looking at your page.
- Semi-blind contour = draw while peeking occasionally.
👉 Why it matters: Blind contour builds raw observation, while semi-blind contour balances accuracy with freedom.
Step 2 – Make Decisions, Not Scribbles
Contour drawing isn’t about creating hundreds of scratchy lines. It’s about committing to one line at a time:
- Look at your subject
- Judge the angle (vertical, horizontal, or diagonal)
- Put it down once — confidently
👉 Why it matters: Every line becomes intentional, even if it’s not perfect.
Step 3 – Keep the Pen Moving
Try to avoid lifting your pen as much as possible. Follow the edges of your subject in one continuous line, only lifting when you absolutely need to move to a new shape.
👉 Why it matters: Continuous lines help your brain focus on seeing rather than overthinking.
Step 4 – Use Comparisons & Guides
- Relate angles to vertical and horizontal “anchors”
- Imagine a clock face to judge directions
- Pay attention to negative shapes (spaces around the subject)
👉 Why it matters: These tricks give you more accuracy without breaking the contour-drawing flow.
Step 5 – Time Yourself
Set a timer for 2 minutes per drawing. The time limit keeps you from fussing, overcorrecting, or erasing.
👉 Why it matters: Quick studies train decision-making and keep your practice honest.
Example: The Alarm Clock Demo
In this video, we practice semi-blind contour using an alarm clock. Notice how the lines aren’t perfect, but the overall form feels solid and honest. That’s the real goal: clarity over perfection.

Why This Exercise Works
- Builds hand–eye coordination
- Improves line confidence
- Helps you see angles, shapes, and proportions clearly
- Keeps drawings loose and expressive
Motivational Reminder
It doesn’t matter if the drawing looks strange or even a little awkward. What matters is that every line is a decision. Over time, this practice will sharpen your observation skills, make your lines more confident, and ultimately elevate your drawing skills.
Next Steps
Add this exercise to your daily warm-ups, then explore more beginner-friendly projects:
👉 How to Draw a Coffee Cup →
👉 How to Draw a Hammer →
👉 How to Draw a Tube of Paint →
👉 Or return to the Free Beginner Drawing Course